User Guide
Ernie's Hikes records your hikes, dog walks, runs, bike rides and paddles with GPS. It tracks your route, distance, speed, elevation, steps and the weather while you're out. You can drop markers for wildlife, hazards and places you like, and take geotagged photos. Afterwards you can look back at every outing on a map and see your personal records. Hikes sync between your iPhone, iPad and Apple Watch through iCloud.
1. Getting Started
Permissions
The first time you use each feature, Ernie's Hikes asks for permission. Grant these for the best experience:
| Permission | Why it's needed | When you're asked |
|---|---|---|
| Location (While Using, or Always) | Records your route and shows you on the map. Choose Always so recording continues with the screen locked. | First time you open the New Hike tab |
| Motion & Fitness | Counts your steps and reads the barometer for accurate altitude | When you start your first hike |
| Camera | Takes photos during a hike | First time you tap the camera button |
| Photos (add only) | Saves a full-quality copy of each photo to your Photos library (if you've turned that on) | First photo you take |
| Live Activities | Shows your hike on the Lock Screen and in the Dynamic Island | When you start your first hike |
| Health (Apple Watch) | Heart rate, and saving the hike as a Hiking workout in Health | First launch of the watch app |
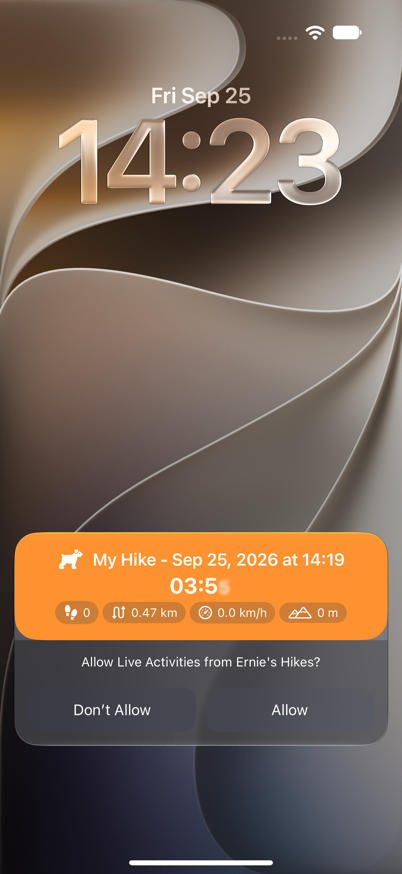
Tip: You can change any of these later in the iPhone Settings app → Ernie's Hikes.
Your first hike in four taps
- Open the app and tap the New Hike tab (second tab).
- Tap the green ▶︎ play button.
- Walk! The map follows you and draws your route.
- When you're done, tap the red ■ stop button, then END & SAVE.
That's it. Your hike now appears in History, with its map and statistics.
2. The iPhone App at a Glance
The tab bar at the bottom of the screen has five tabs:
| Tab | Icon | What it does |
|---|---|---|
| History | List | All your recorded hikes as tiles |
| New Hike / Active Hike | ⊕ / hiker | Starts a hike. While you're recording, it's renamed Active Hike and shows a red LIVE badge. |
| Metrics | Clipboard chart | Personal records and totals across every hike |
| Weather | Sun and cloud | A detailed weather report for where you are |
| Near Me | Target | City of Ottawa parks near you, with dog rules |
The ⚙︎ gear button at the top-left of History, Metrics and Near Me opens Settings.
You can choose which tab the app opens to in Settings → Default Start Page. For example, pick New Hike so you can start recording as soon as the app opens.
3. Recording a Hike (New Hike Tab)
Before you start
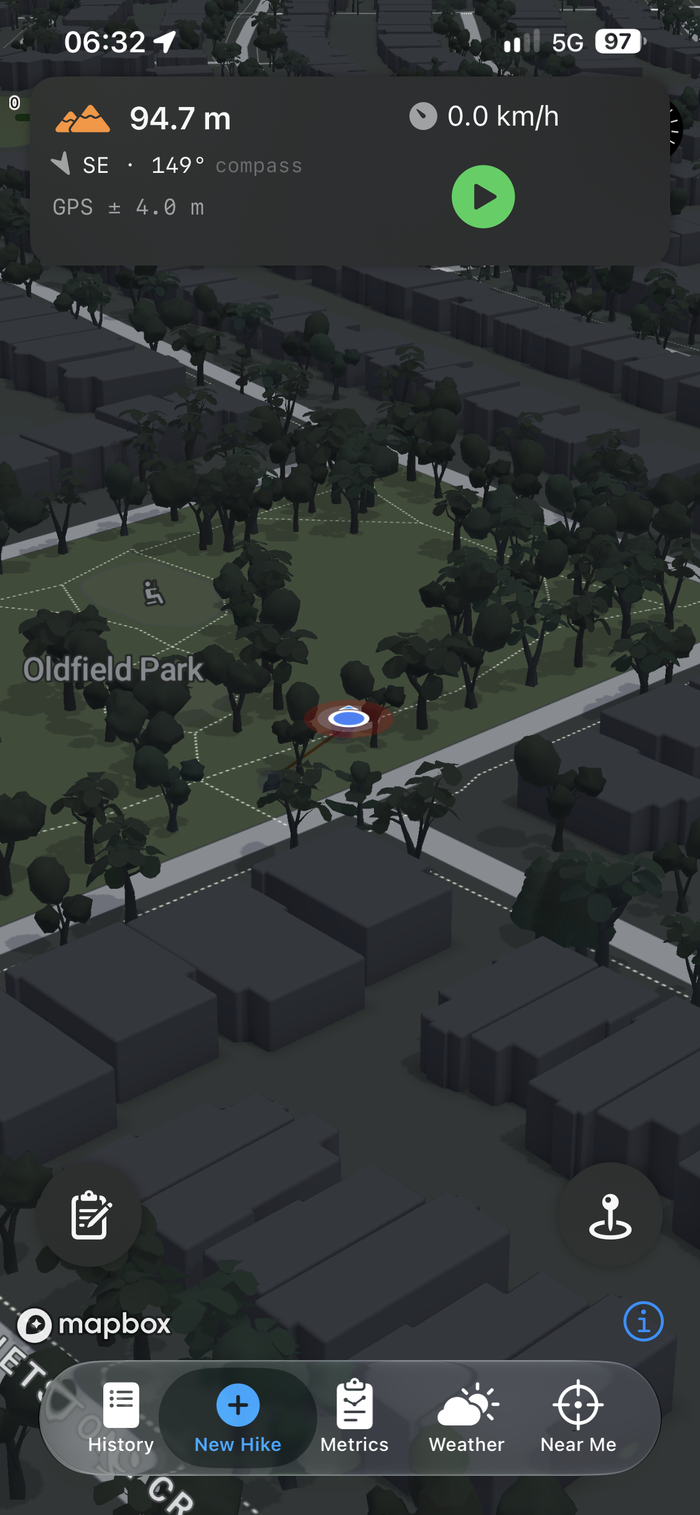
The New Hike tab opens a full-screen 3D map centred on your position. Your location dot pulses green when you're moving and red when you're standing still.
The Control Panel at the top of the screen shows live readings even before you start:
| Reading | Icon | Details |
|---|---|---|
| Altitude | Orange mountains | Your current elevation. It combines GPS with the iPhone's barometer for a steadier reading. |
| Heading | Arrow | Compass direction and degrees (e.g. NE · 42°). A small label shows where the heading comes from: compass or GPS (from your direction of travel). |
| Speed | Gauge | Your current speed |
| Distance | Route | Distance travelled so far. Appears once you've moved. |
| GPS ± | — | Accuracy of the altitude reading. Smaller is better. |
| Pressure | — | Barometric pressure in kPa |
| No barometer / No compass | Orange text | Shown if your device lacks that sensor, as in the Simulator used for these screenshots |
You may also see one of these status messages in the panel:
- Waiting for location permission… — respond to the location prompt.
- Location access denied — turn Location on in the iPhone Settings app.
- Acquiring altitude… — the app is waiting for its first good GPS fix. This usually takes a few seconds outdoors.
Starting a hike
Tap the green ▶︎ button. The app then:
- Creates a new hike named from your Default Hike Title plus the date and time (for example, My Hike - Sep 25, 2026 at 14:19).
- Uses your Default Activity Type and Trail Companion name from Settings. You can change all of these afterwards.
- Starts the step counter, the elapsed timer and the Live Activity.
- Records the weather conditions at the start of the hike.
- Switches the tab to Active Hike with a LIVE badge.
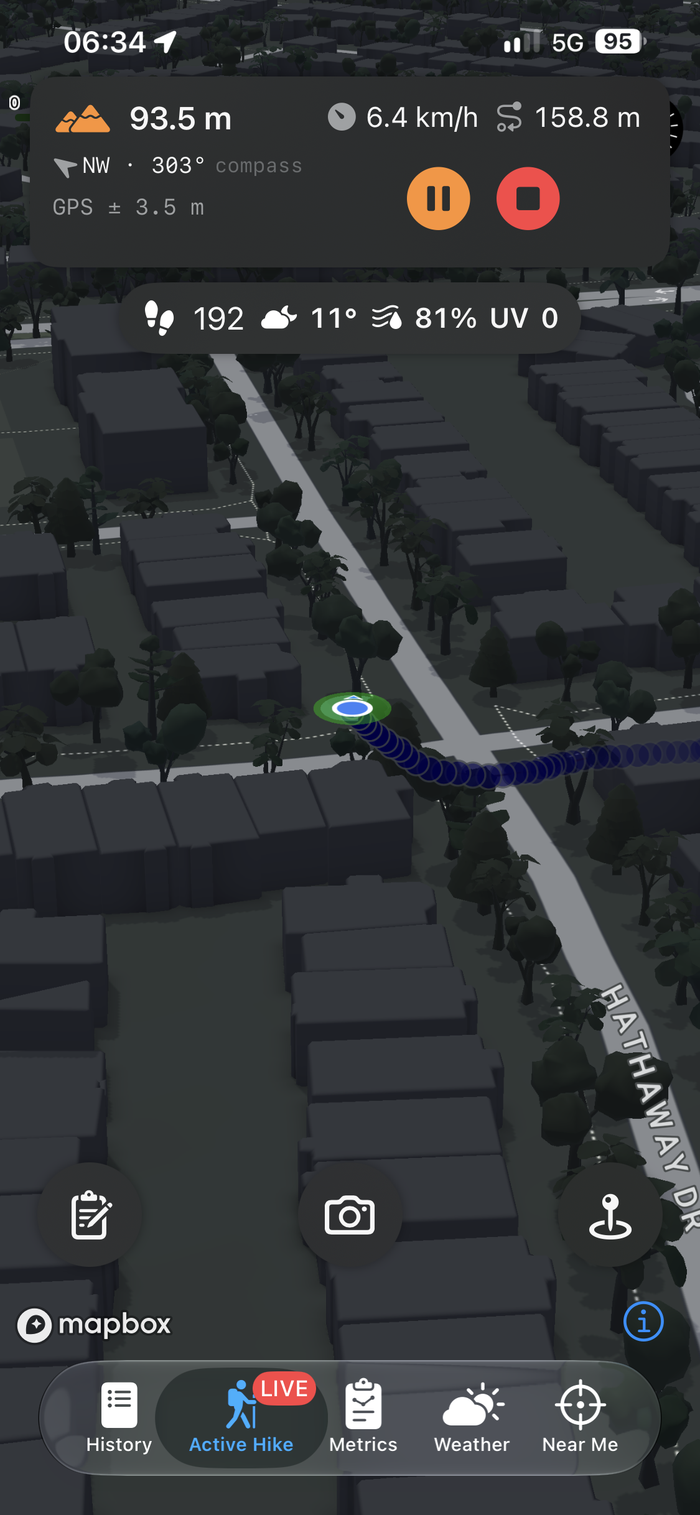
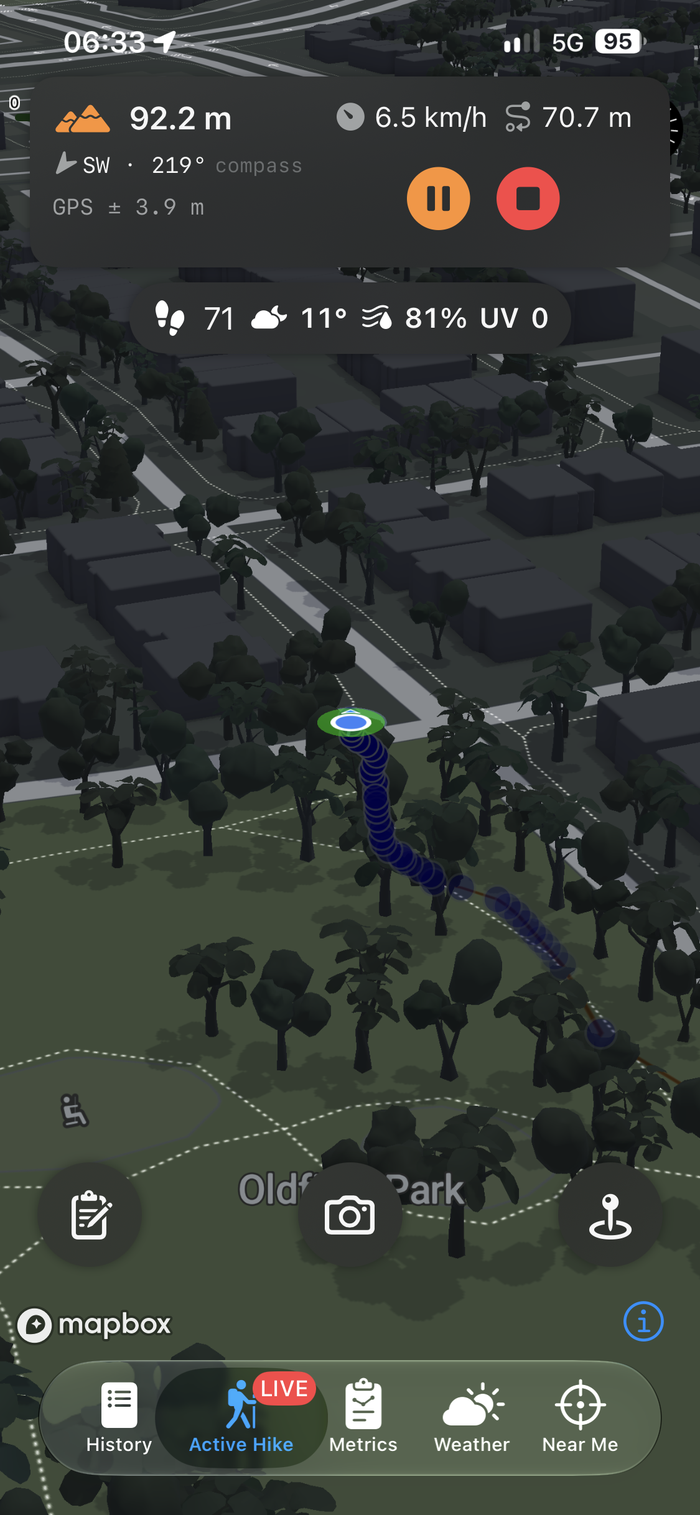
While you're hiking
- Route line: An orange line traces your path. Fading blue footprints show where you've just been.
- Map orientation: In North mode, north is always at the top. In Heading mode, the map turns to face your direction of travel, in 5° steps. You set this in Settings.
- Conditions pill: Below the Control Panel, a pill shows your step count, the weather icon, the feels-like temperature, the humidity and the UV index. Weather updates at most every 5 minutes.
- Screen locked or app in the background: Recording continues as long as Location is allowed. Your progress shows on the Lock Screen (see Live Activity).
The buttons along the bottom of the map:
| Position | Button | Action |
|---|---|---|
| Bottom-left | 📋 Clipboard | Opens the detailed Add Marker form |
| Bottom-centre | 📷 Camera | Takes a geotagged photo. Only shown while recording. |
| Bottom-right | 📍 Map pin | Opens the Quick Markers panel |
Pausing and resuming
Tap the orange ⏸ pause button in the Control Panel to take a break without ending the hike. A large pulsing orange pause symbol appears over the map. GPS recording, the step counter and the timer all stop, and your progress so far is saved.
Tap the yellow ↻ resume button to carry on.
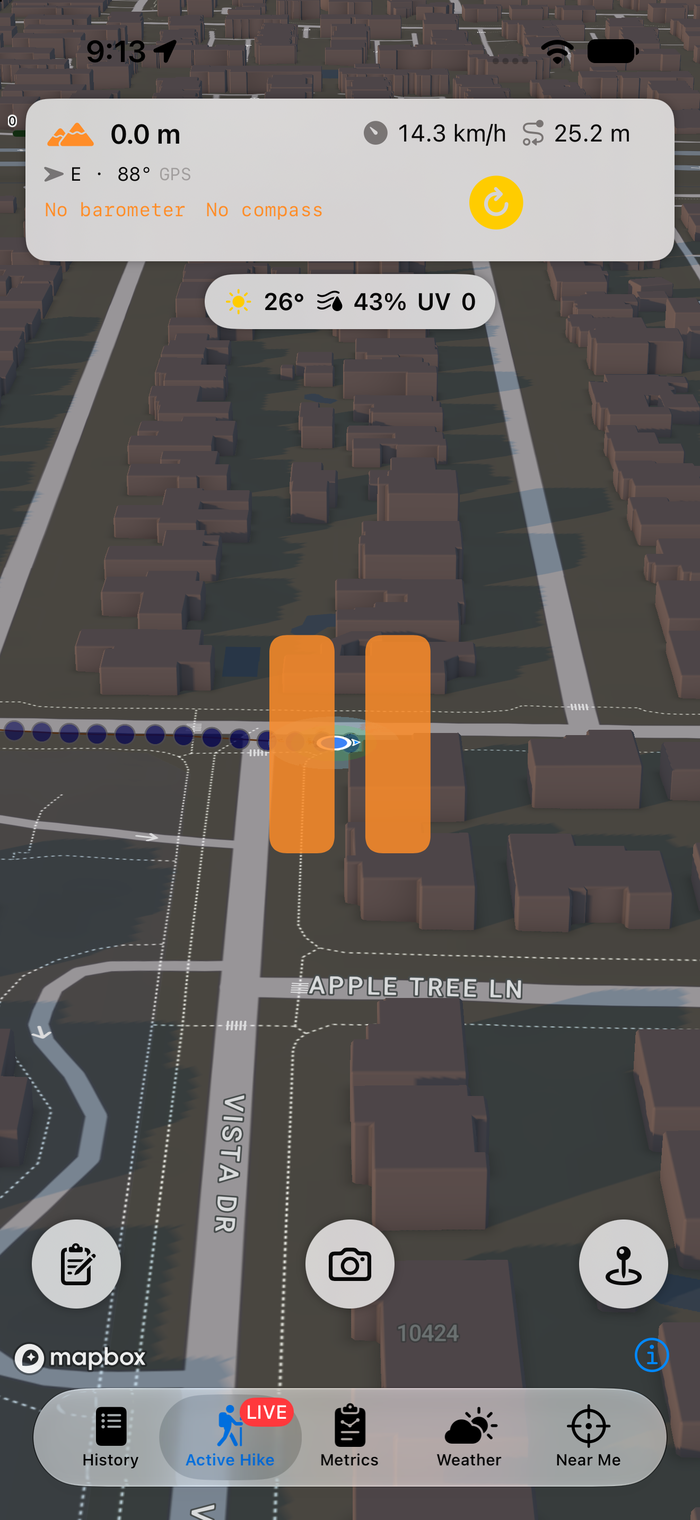
The stop button is hidden while you're paused. Resume first, then stop.
Ending a hike
Tap the red ■ stop button. The End Hike alert offers three choices:
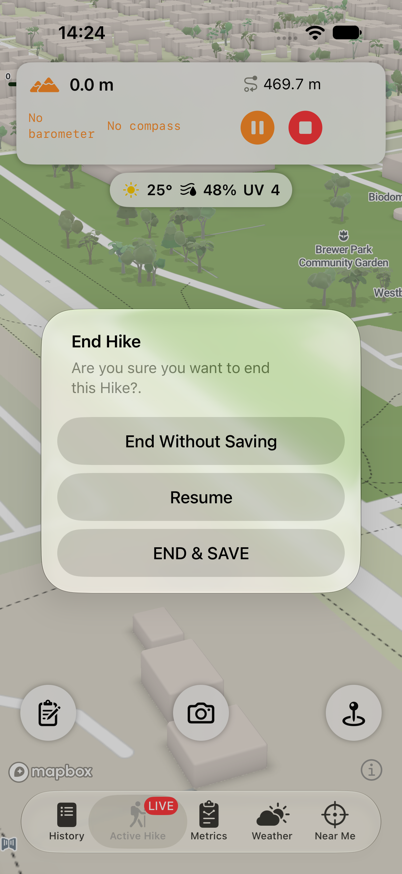
| Button | Result |
|---|---|
| End Without Saving | Stops recording and permanently deletes this hike |
| Resume | Closes the alert and keeps recording |
| END & SAVE | Stops recording, works out the final statistics (distance, ascent, descent, max elevation, average speed, average weather and steps) and saves the hike to History |
Resume sits between the other two buttons so you're less likely to discard a hike by mistake.
4. Markers and Photos
Quick Markers
Tap the 📍 map pin button (bottom-right) during a hike. Two columns of marker buttons slide out. Tap one to drop that marker at your current position. You'll feel a haptic tap, and a large confirmation appears in the middle of the screen for two seconds.
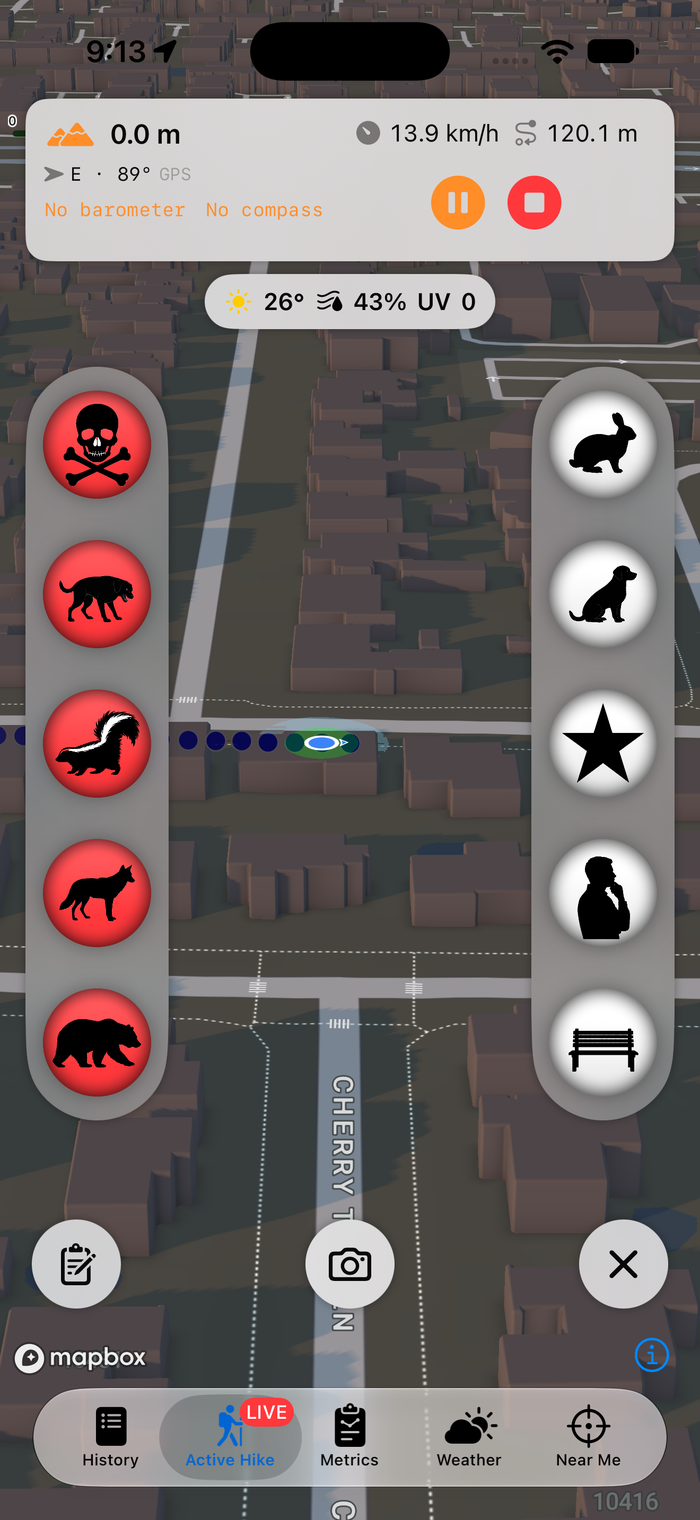
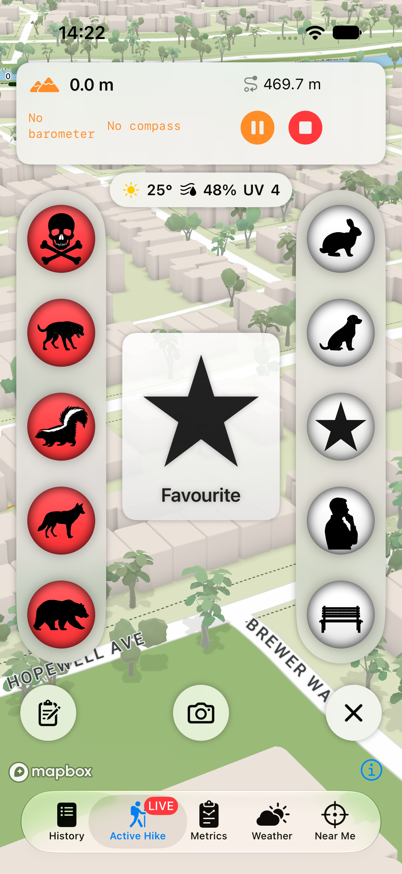
| Left column: warnings (red) | Right column: points of interest (white) |
|---|---|
| Hazard | Rabbit |
| Angry Dog | Happy Dog |
| Skunk | Favourite |
| Coyote | Point of Interest |
| Bear | Rest Stop |
Each marker saves your GPS location, altitude and time. Warning markers have a red background on every map, so hazards stand out when you look back at a route. Tap ✕ to close the columns.
The marker buttons are dimmed and disabled when no hike is being recorded.
Detailed markers (Add Marker form)
Tap the 📋 clipboard button (bottom-left) when you want to add a title and notes, for example "Trail washed out — use the bridge 50 m north".
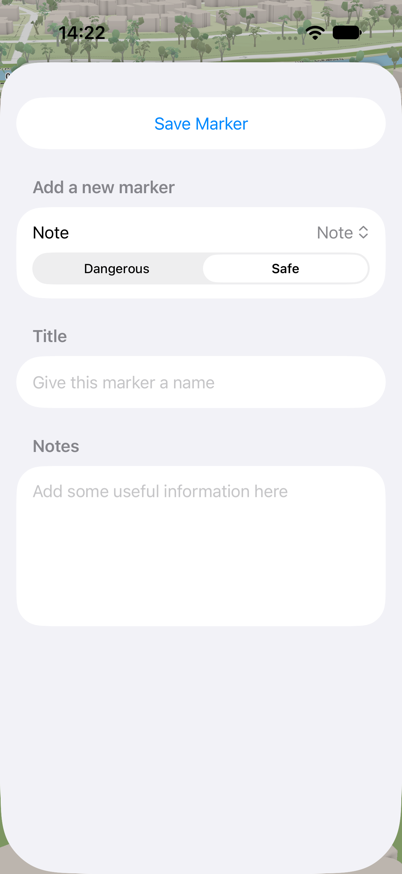
- Choose the marker type from the picker. All 11 types are available, plus Note.
- Risk Level is set automatically for most types. For a Note, you choose Dangerous or Safe yourself.
- Enter a Title and any Notes.
- Tap Save Marker. To close the form without saving, swipe it down.
Photos
Tap the 📷 camera button (bottom-centre) during a hike. The camera opens full screen. Take the photo and it's saved straight away, with no caption to type. A "Photo Saved" confirmation appears for two seconds. Each photo is tagged with your GPS location, altitude and time.
Where your photos are stored depends on Settings → Photo Storage:
| Setting | Behaviour |
|---|---|
| App & Photos (default) | The app keeps a copy at 80% quality, and a full-quality copy goes to your Photos library |
| App Only | Photos are kept only in the app (80% quality), on the device that took them |
Photos show up as orange camera pins on the hike map and in the hike's Photos grid (see Hike Details).
5. Live Activity, Lock Screen and Dynamic Island
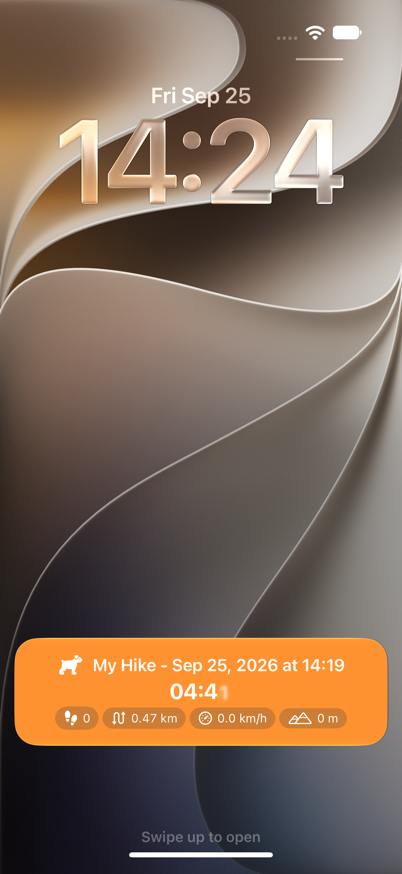
While a hike is being recorded, a Live Activity keeps your progress visible without unlocking your phone.
| Where | What you see |
|---|---|
| Lock Screen / StandBy | An orange banner with the hike name and icon, the elapsed time in large type, and pills for steps, distance, speed and altitude |
| Dynamic Island (compact) | Your activity icon on the left and distance on the right |
| Dynamic Island (expanded) — touch and hold | Time and distance at the top; steps, speed and altitude below |
| Apple Watch Smart Stack | A card with time, distance, steps, speed and altitude |
Tap the Live Activity to jump straight back to the Active Hike screen. The Live Activity ends when you end the hike.
6. Hike History
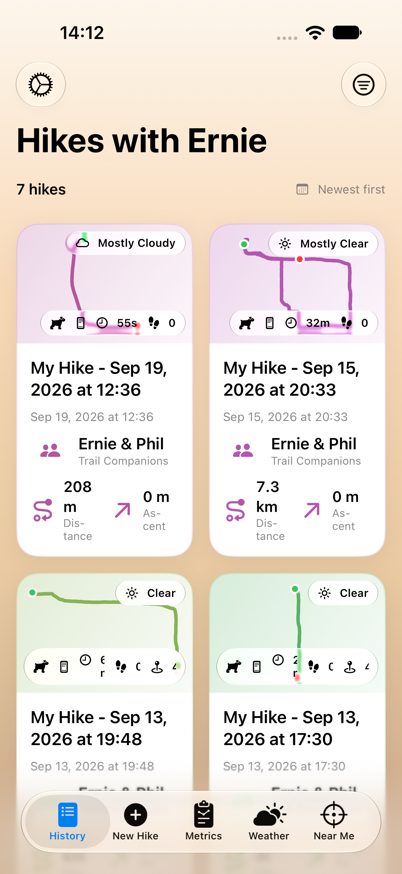
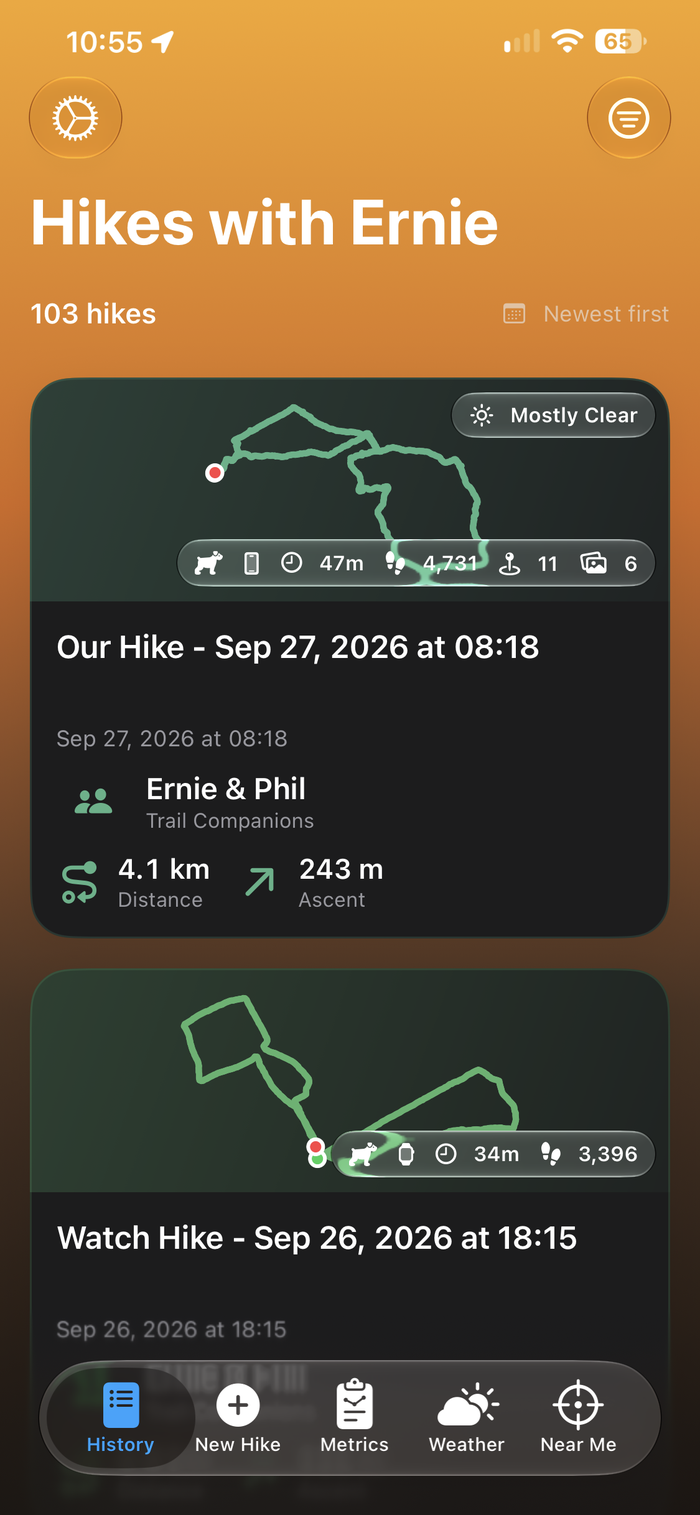
The History tab shows every hike you've recorded on your iPhone, iPad or Apple Watch, as a grid of tiles. The title at the top is your Default List Title (Hikes with Ernie unless you change it).
Reading a hike tile
| Part of the tile | Shows |
|---|---|
| Route drawing | A small drawing of your route, with a green start dot and a red finish dot. A mountain placeholder appears if there's no route yet. |
| LIVE badge (top-left) | A pulsing green dot — this hike is still being recorded |
| Weather chip (top-right) | The conditions when the hike started, e.g. Mostly Cloudy |
| Info chips (bottom-right) | Activity icon, the device it was recorded on (iPhone or Apple Watch), duration, steps, marker count and photo count |
| Title and date | The hike's name and start date and time |
| Trail Companions | Who you hiked with |
| Distance / Ascent | Total distance and total climb |
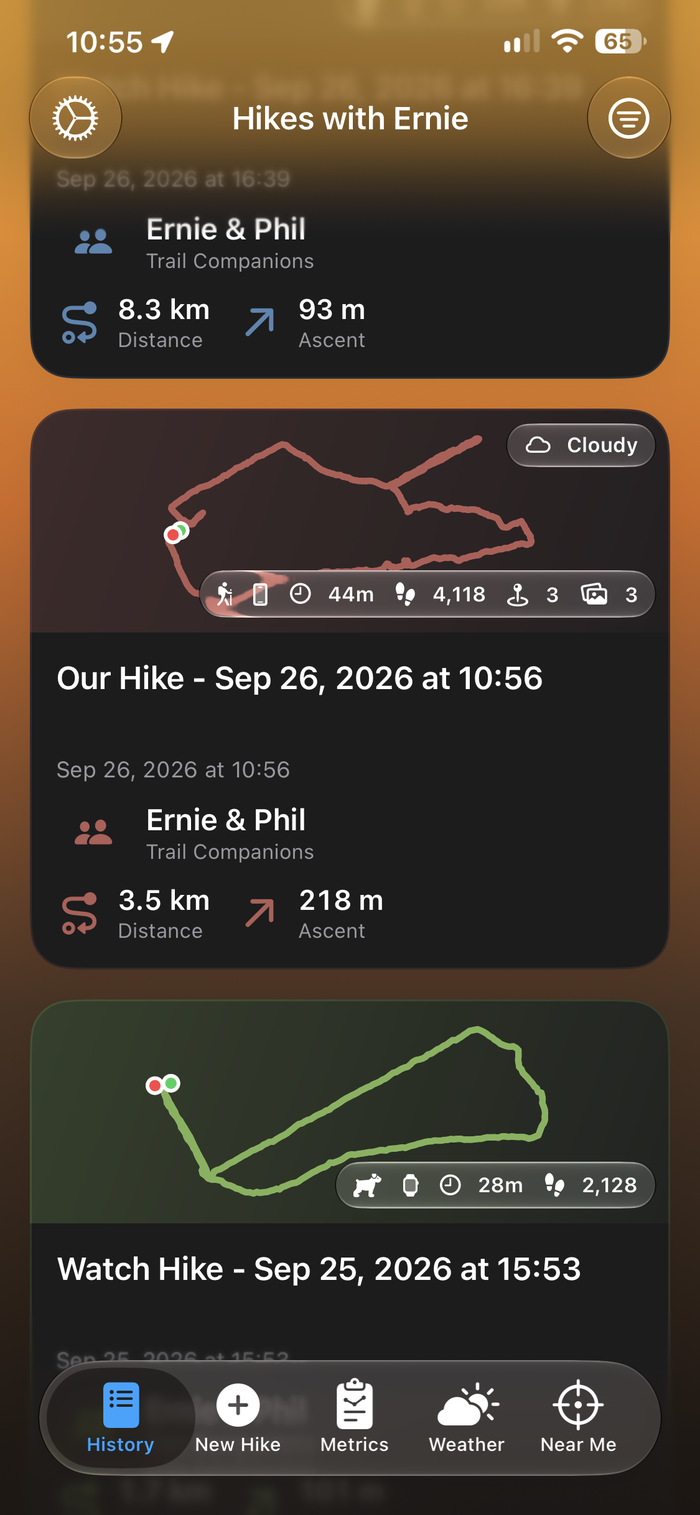
Each hike has its own accent colour, which stays the same every time.
On iPad and in landscape, the grid adds more columns to fill the screen.
Sort and filter
Tap the filter button (top-right) to open the sort and filter menu.
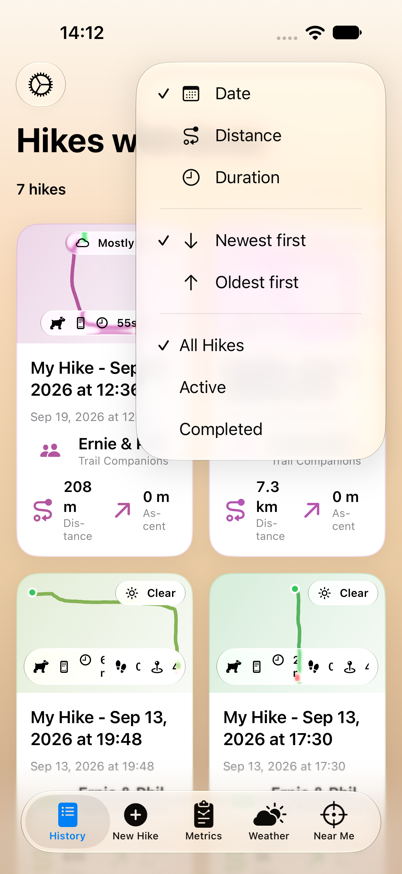
- Sort by: Date, Distance or Duration
- Order: Newest first / Oldest first for dates, Longest first / Shortest first for distance and duration
- Show: All Hikes, Active, or Completed
When anything other than the default (all hikes, newest first) is selected, the filter icon becomes filled as a reminder. The line above the grid shows how many hikes match and the current order. If nothing matches, tap Show All Hikes.
Tap any tile to open its Hike Details. The tile zooms smoothly into the detail screen.
7. Hike Details
The route map
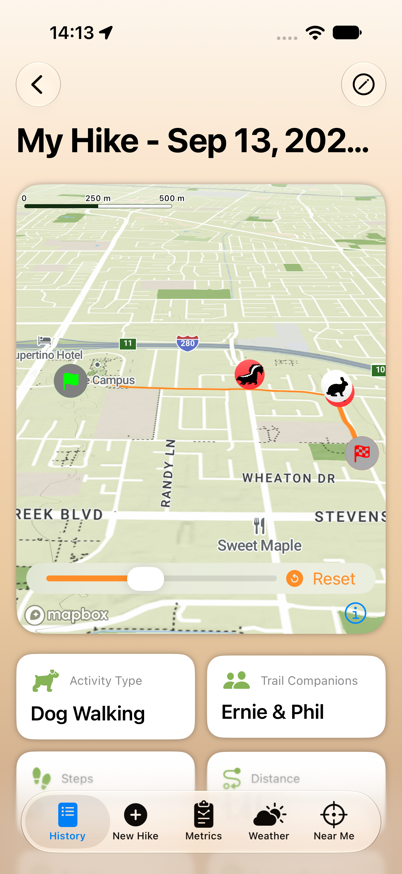
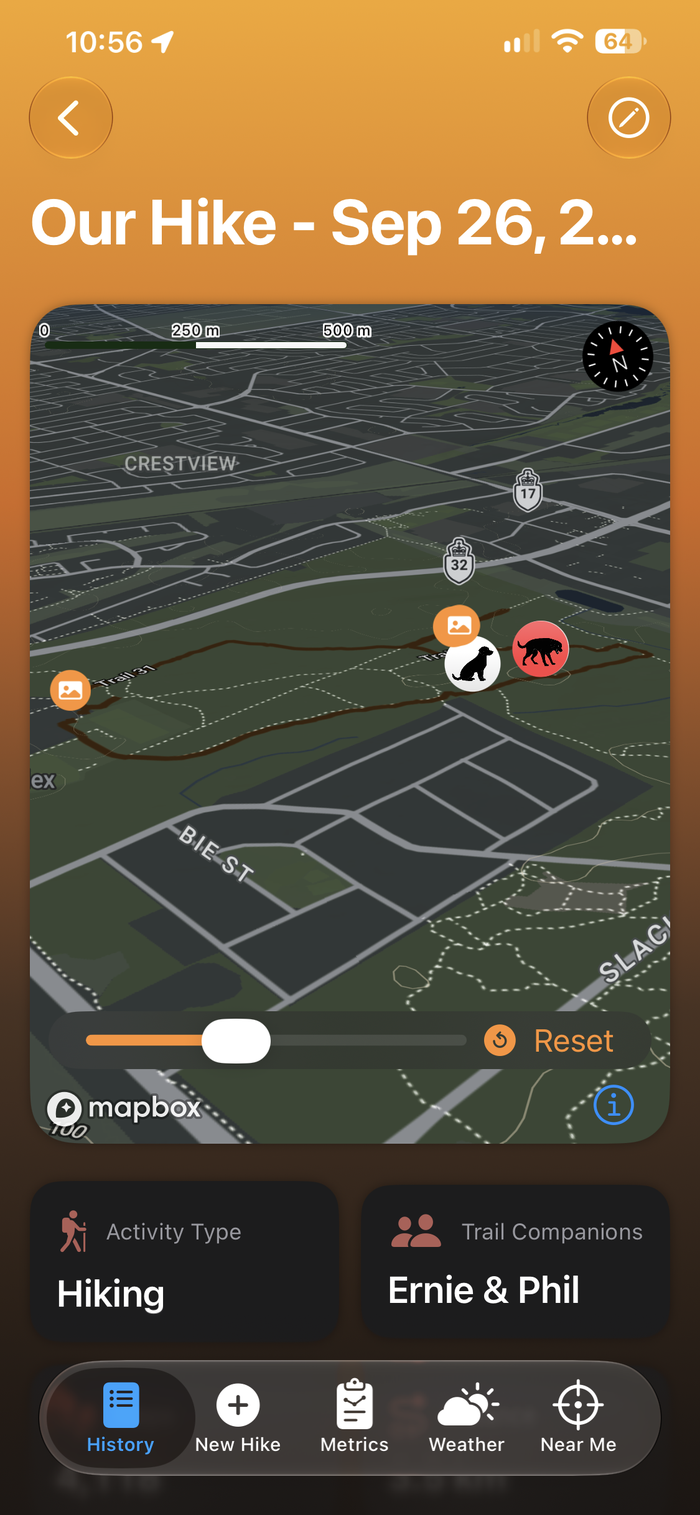
When the screen opens, the map starts from a view of the whole globe and flies down to your route, tilted in 3D. On the map you'll find:
- The orange route line
- A green flag at the start and a chequered flag at the finish
- Every marker you dropped. Warning markers are red.
- Orange camera pins where you took photos
Things you can do on the map:
| Action | Result |
|---|---|
| Tap a marker | A card pops up for two seconds with the marker's title, the time, how long ago it was, and any notes |
| Tap a photo pin | A thumbnail and the time it was taken appear for five seconds. Tap the thumbnail to close it sooner. |
| Zoom slider | Appears after the fly-in finishes. Drag it to zoom in and out. |
| Reset | Flies back to show the whole route |
| Pinch, drag, rotate | Normal map gestures work too |
Stat cards
Below the map is a grid of cards. You can change their order in Settings → Order of the Stat Cards.
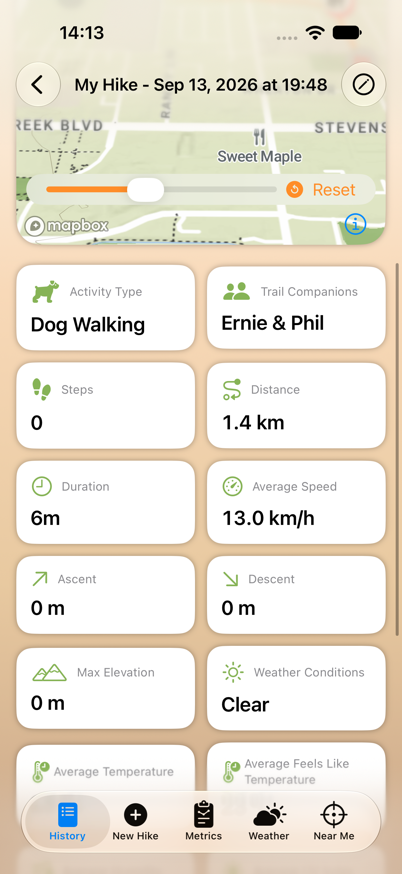
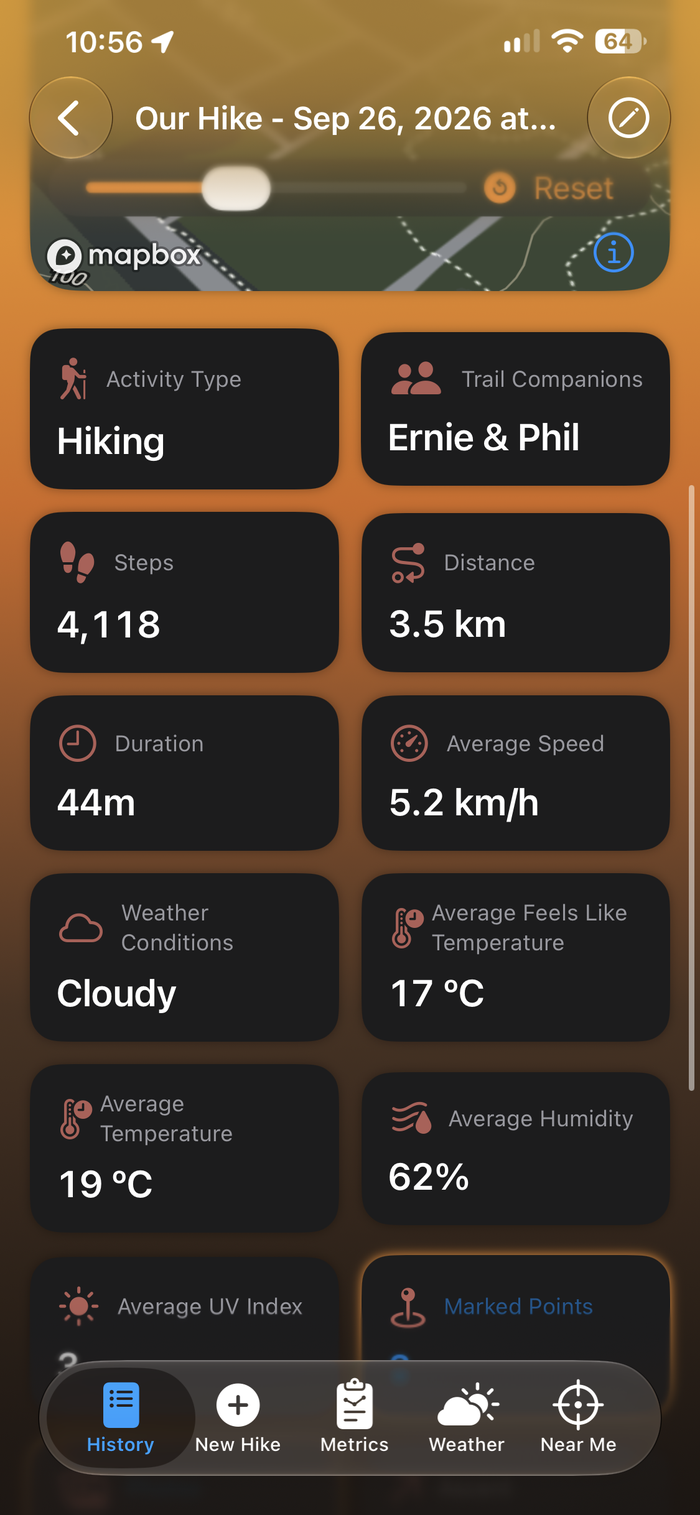
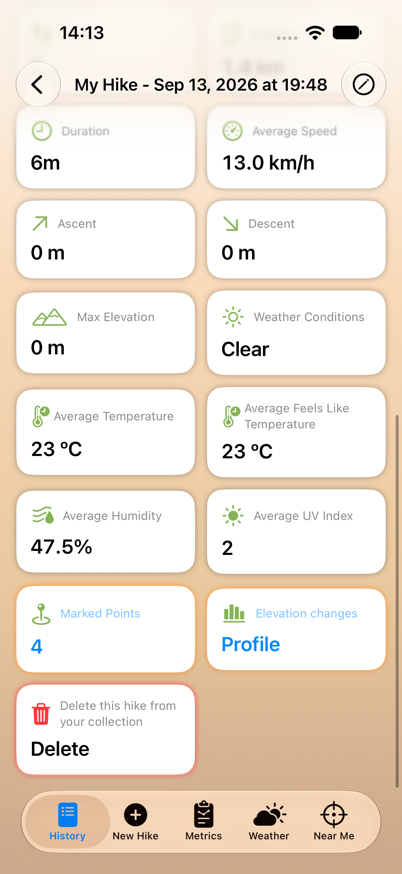
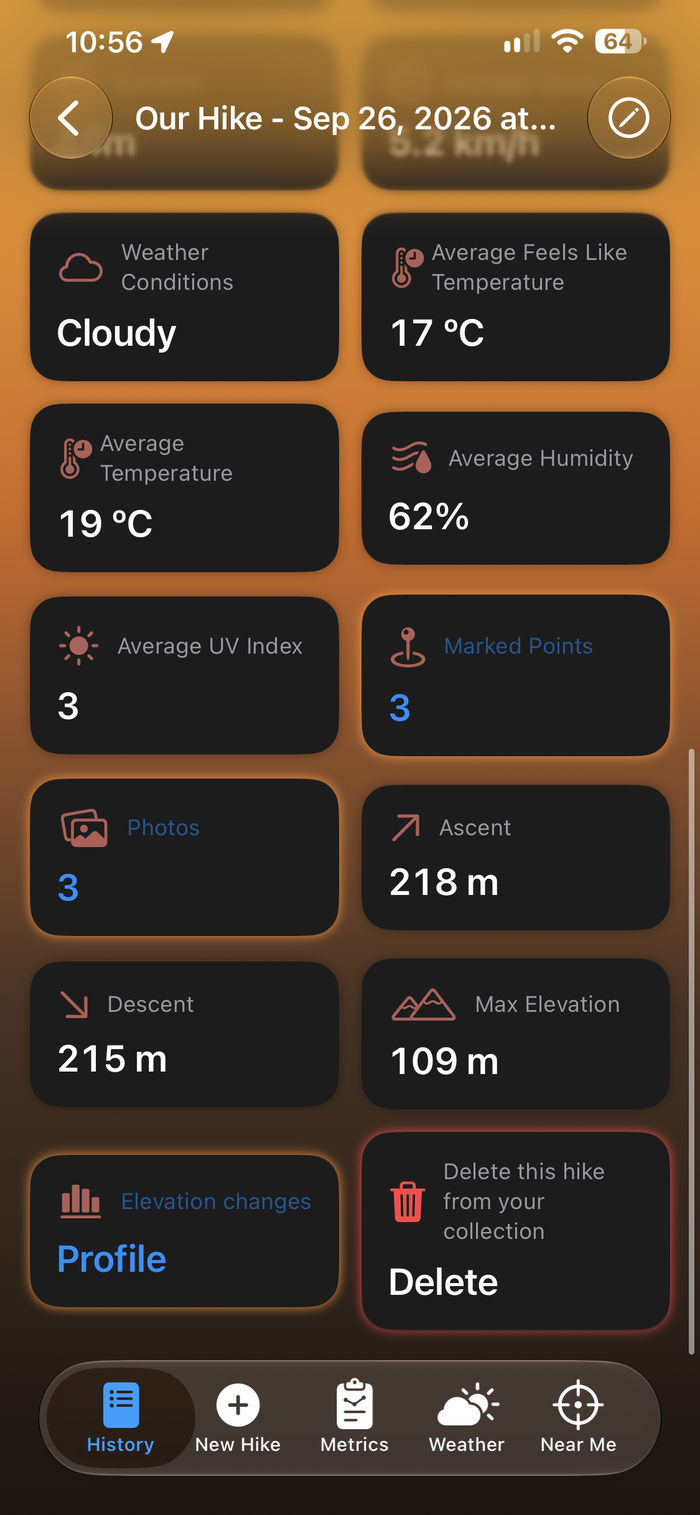
| Card | Shows | Notes |
|---|---|---|
| Activity Type | e.g. Dog Walking | |
| Trail Companions | Who you were with | |
| Steps | Steps counted | |
| Distance | Total distance | Metric or imperial, per Settings |
| Duration | Total time | |
| Average Speed | Average moving speed | |
| Ascent / Descent | Total climb and total descent | |
| Max Elevation | Highest point reached | |
| Weather Conditions | Conditions at the start | Only if weather was recorded |
| Average Temperature / Feels Like | Averages over the hike | Only if weather was recorded |
| Average Humidity / UV Index | Averages over the hike | Only if weather was recorded |
| Marked Points | Number of markers — tap to open the list | Only if the hike has markers |
| Photos | Number of photos — tap to open the grid | Only if the hike has photos |
| Notes | Tap to read the hike's notes | Only if the hike has notes |
| Profile | Tap to open the Elevation Profile | |
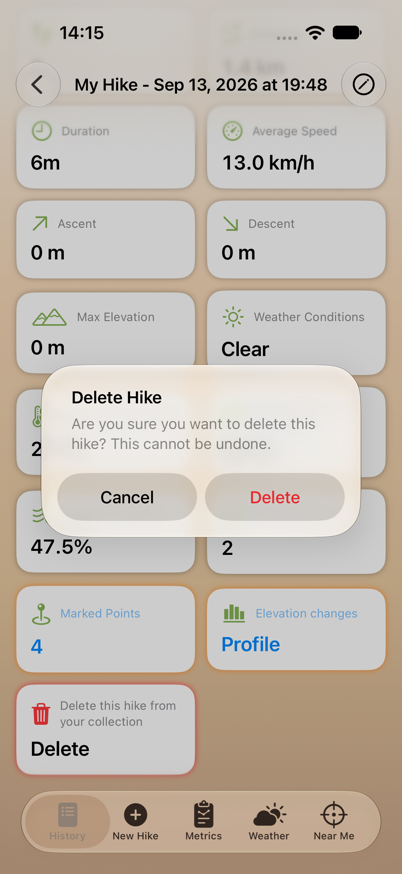
| Delete | Tap to delete the hike |
Cards with an orange glow can be tapped. The Delete card has a red glow.
Marked Points list
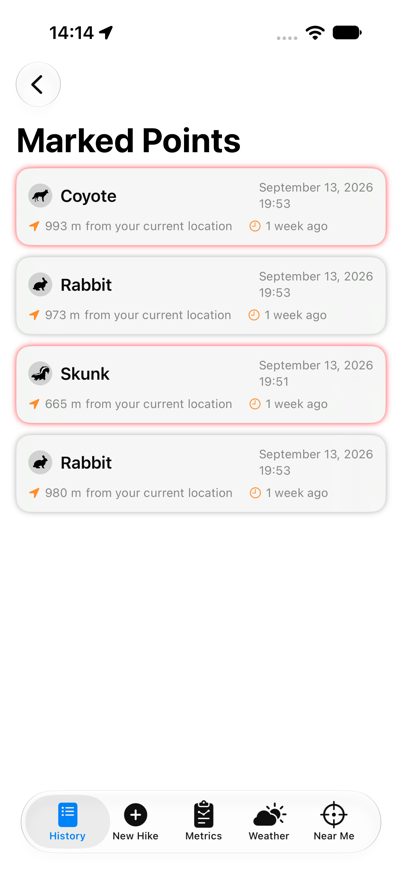
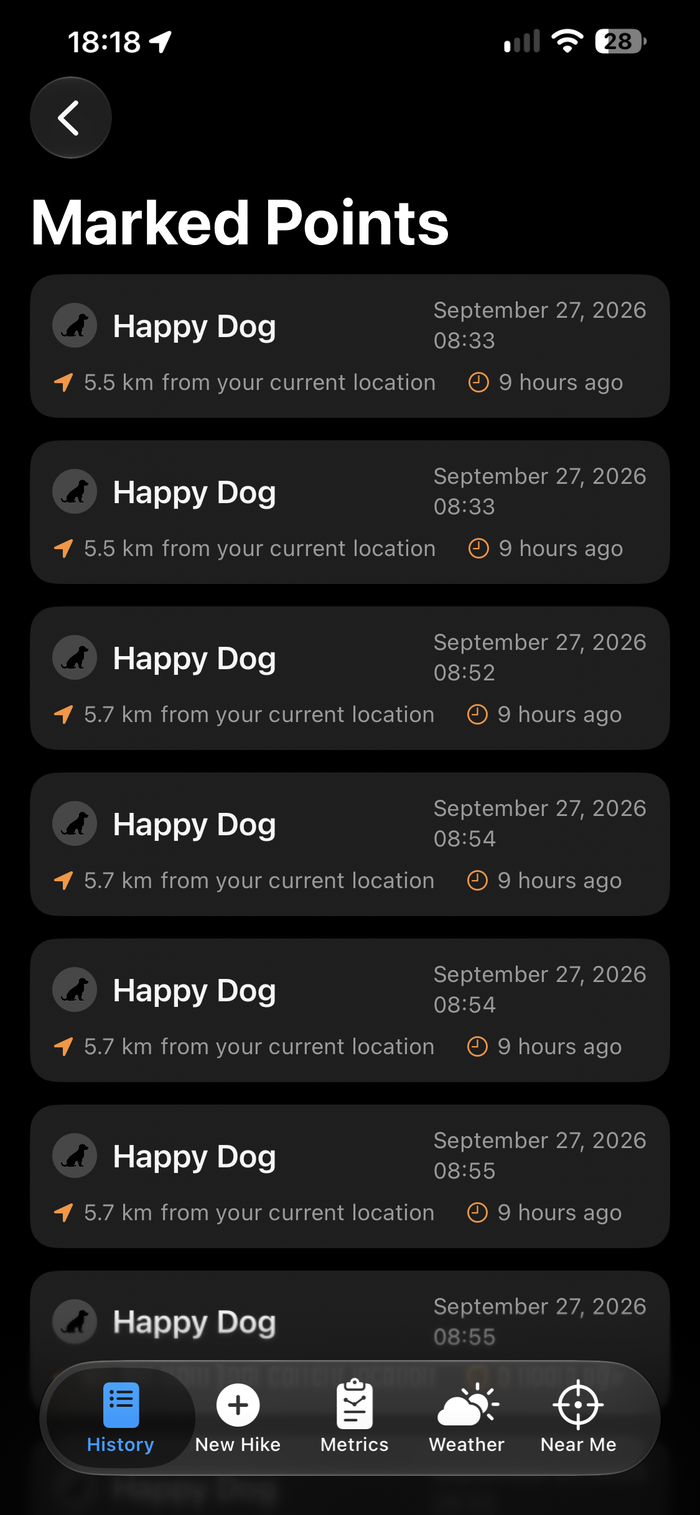
This is a card for every marker on the hike. Each card shows the marker's icon and title, the date and time, any notes, how far it is from where you are now, and how long ago it was added. Warning markers have a red glow.
Photos grid
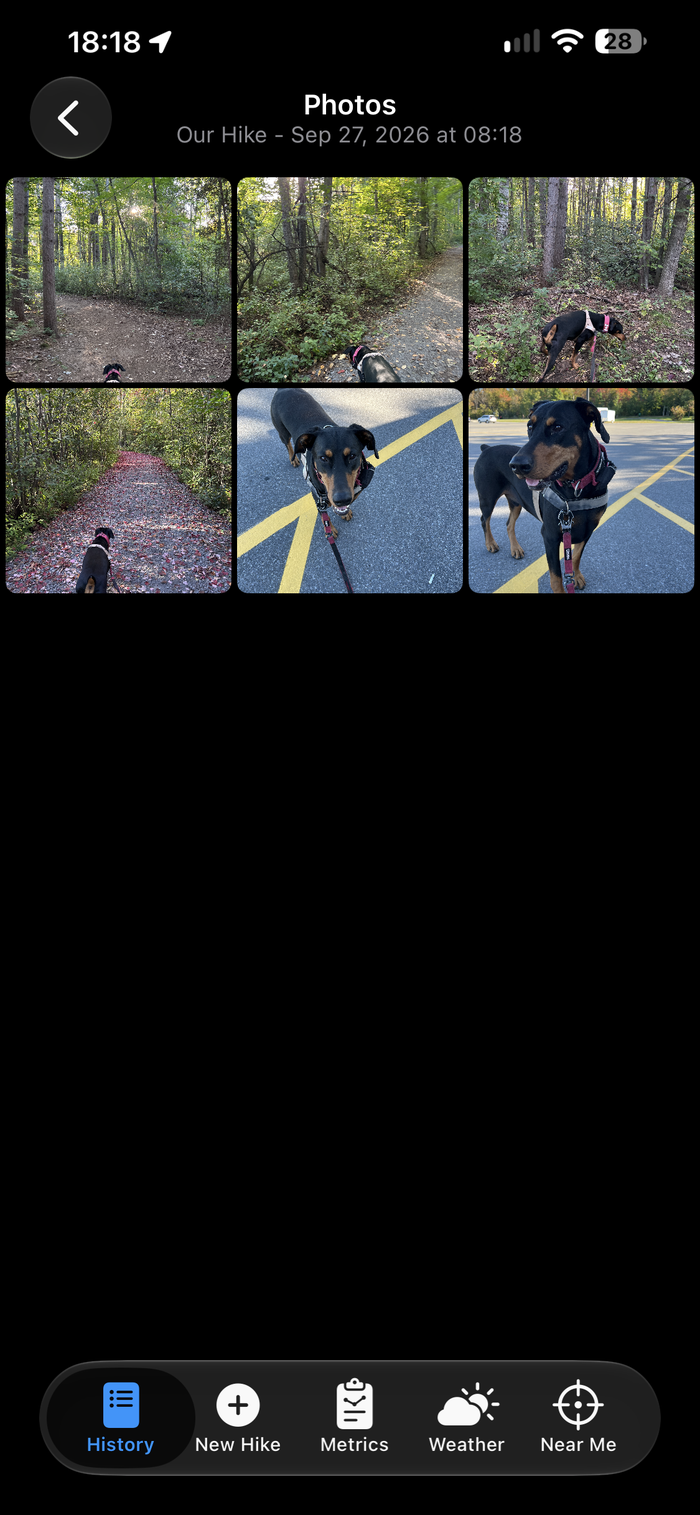
The Photos card opens every photo from the hike in a grid, in the order they were taken. Tap a photo to zoom it to full screen, with the date and time along the bottom. Tap again to shrink it back into the grid.
Elevation Profile
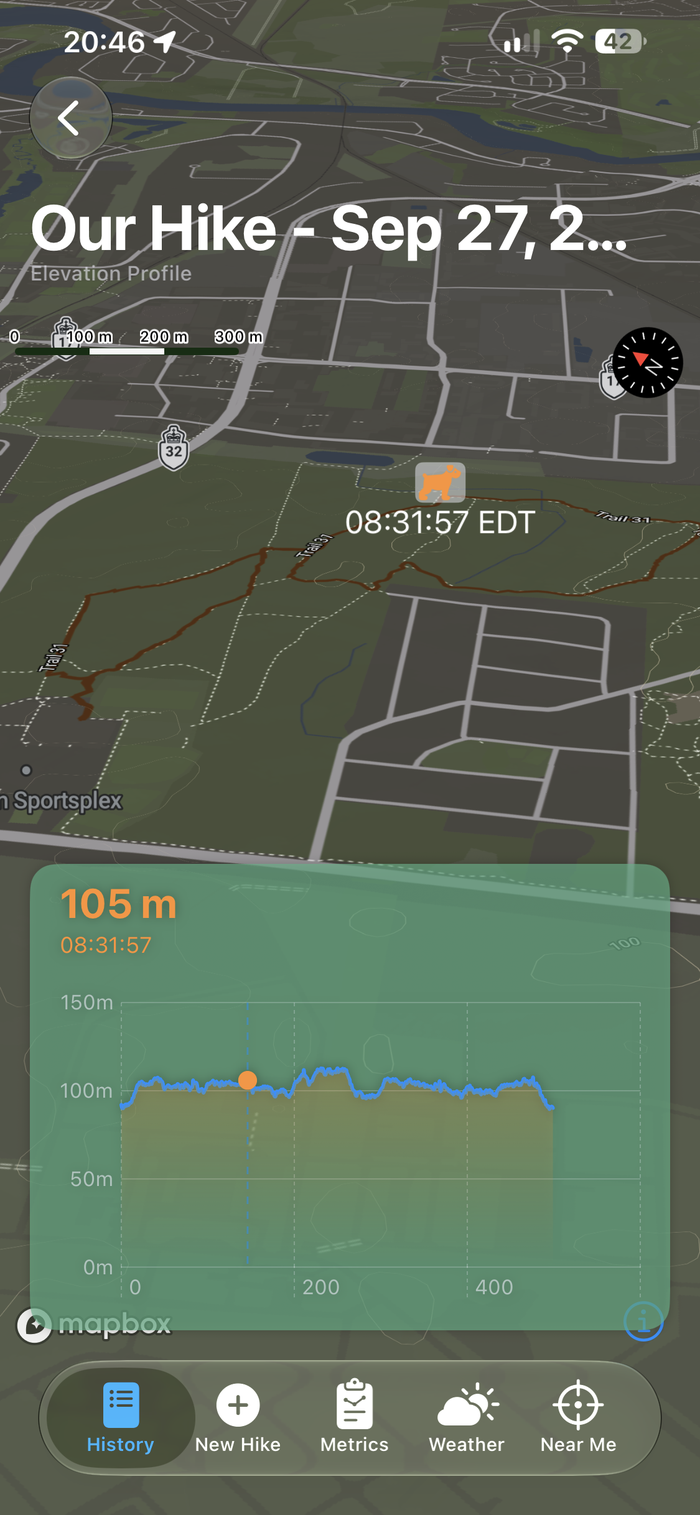
The Profile card opens a full-screen map of the route with an elevation chart at the bottom. Drag your finger along the chart to see the altitude and time at any point. A marker moves along the route on the map to show where you were at that moment.
Notes
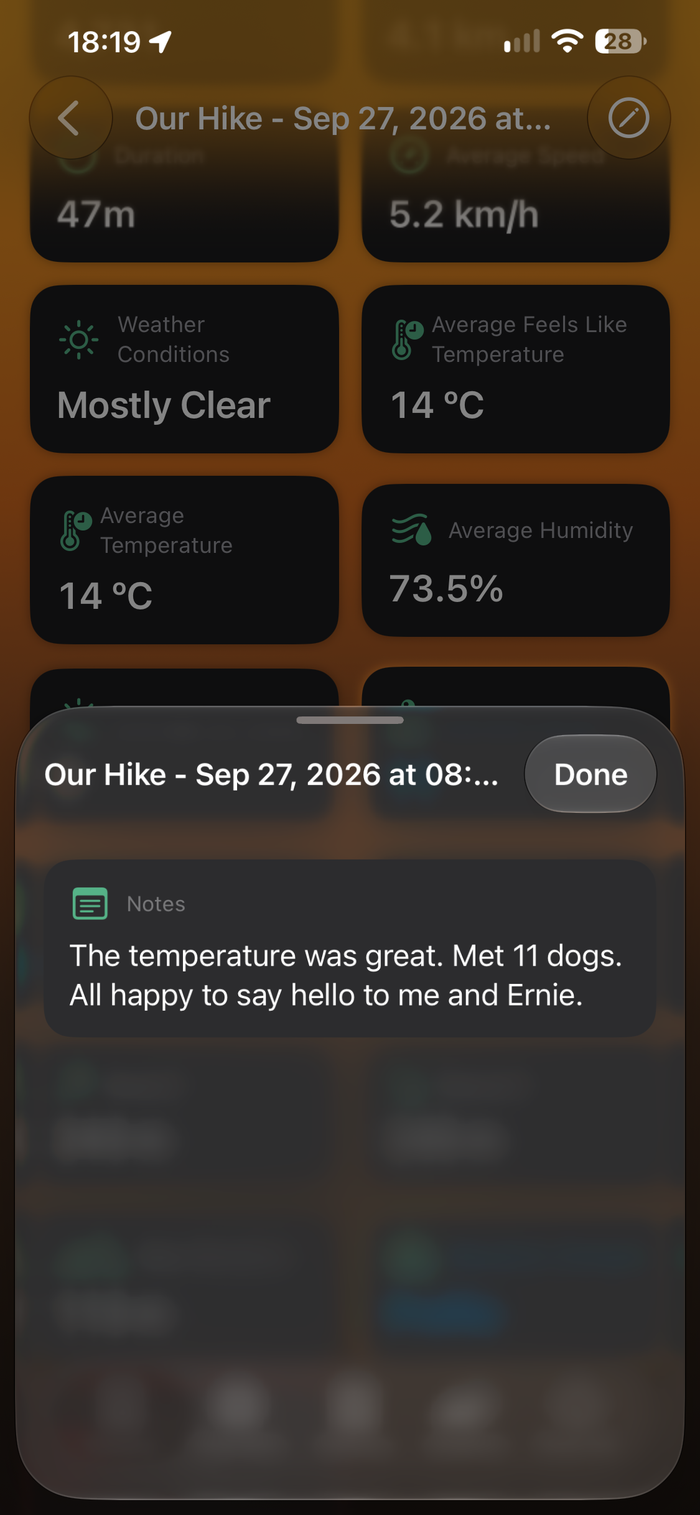
The Notes card opens your notes in a half-height sheet. Swipe up to expand it to full screen, or tap Done to close it.
Editing a hike
Tap the pencil button at the top-right of the detail screen to edit:
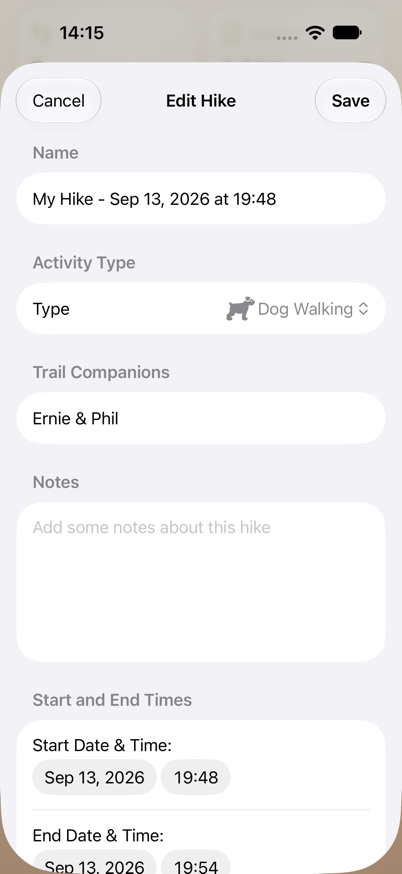
- Name
- Activity Type — Dog Walking, Hiking, Walking, Running, Biking, Driving or Canoeing
- Trail Companions
- Notes
- Start and End Times — useful if you forgot to stop recording
Tap Save to keep your changes or Cancel to discard them. Hikes recorded on the Apple Watch are named Watch Hike - date, and this is where you rename them.
Deleting a hike
Tap the Delete card, then confirm. This permanently removes the hike, along with its markers and photos, from every device signed in to your iCloud account.
8. Metrics — Your Personal Records
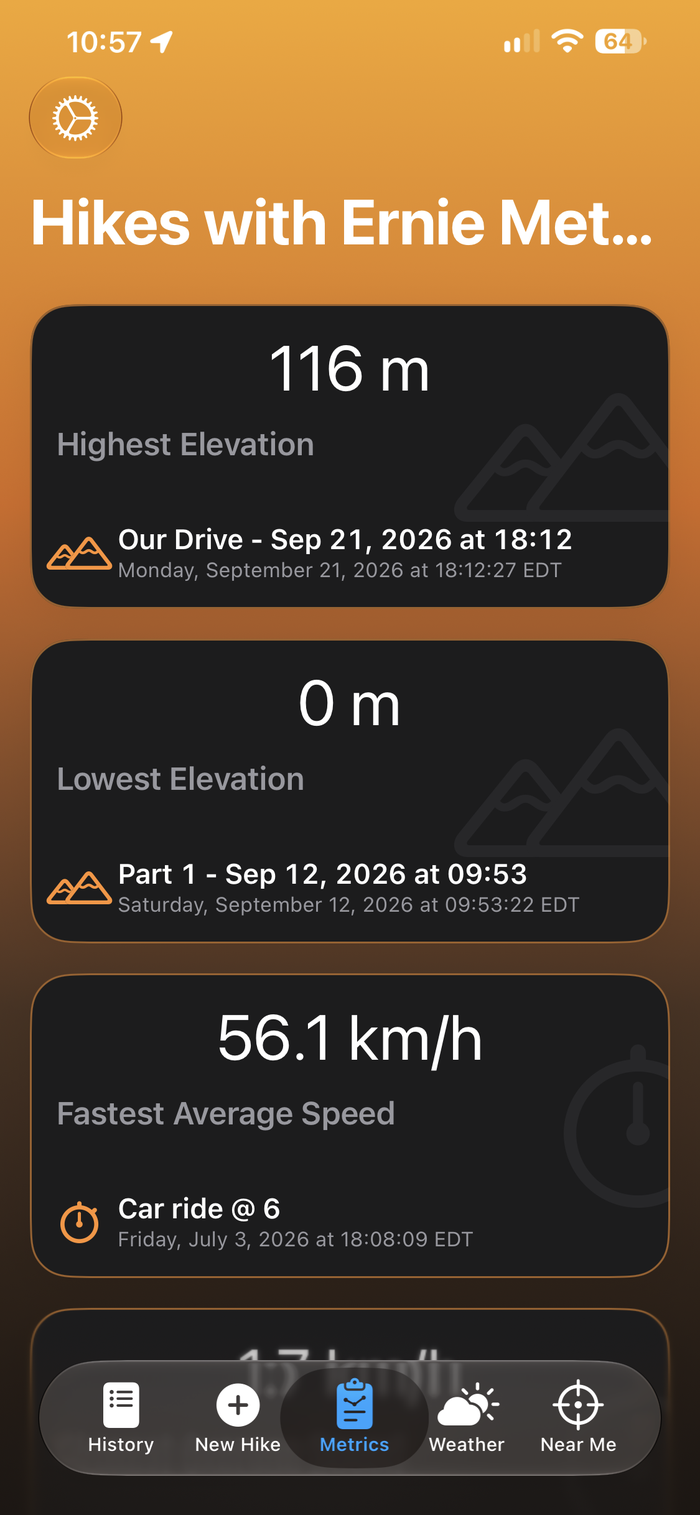
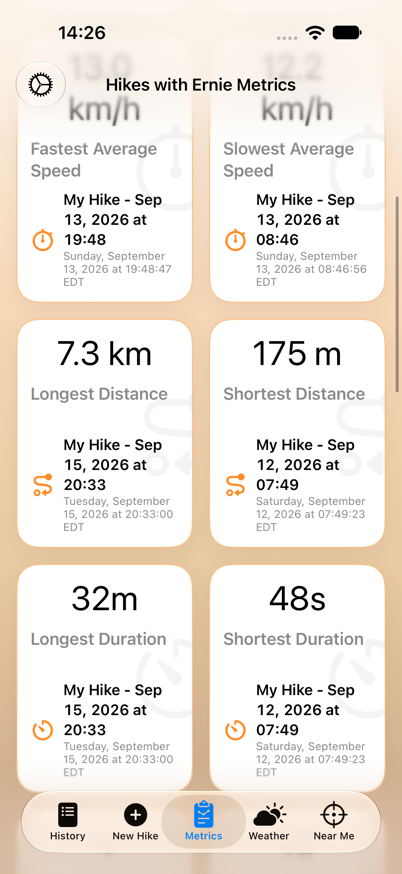
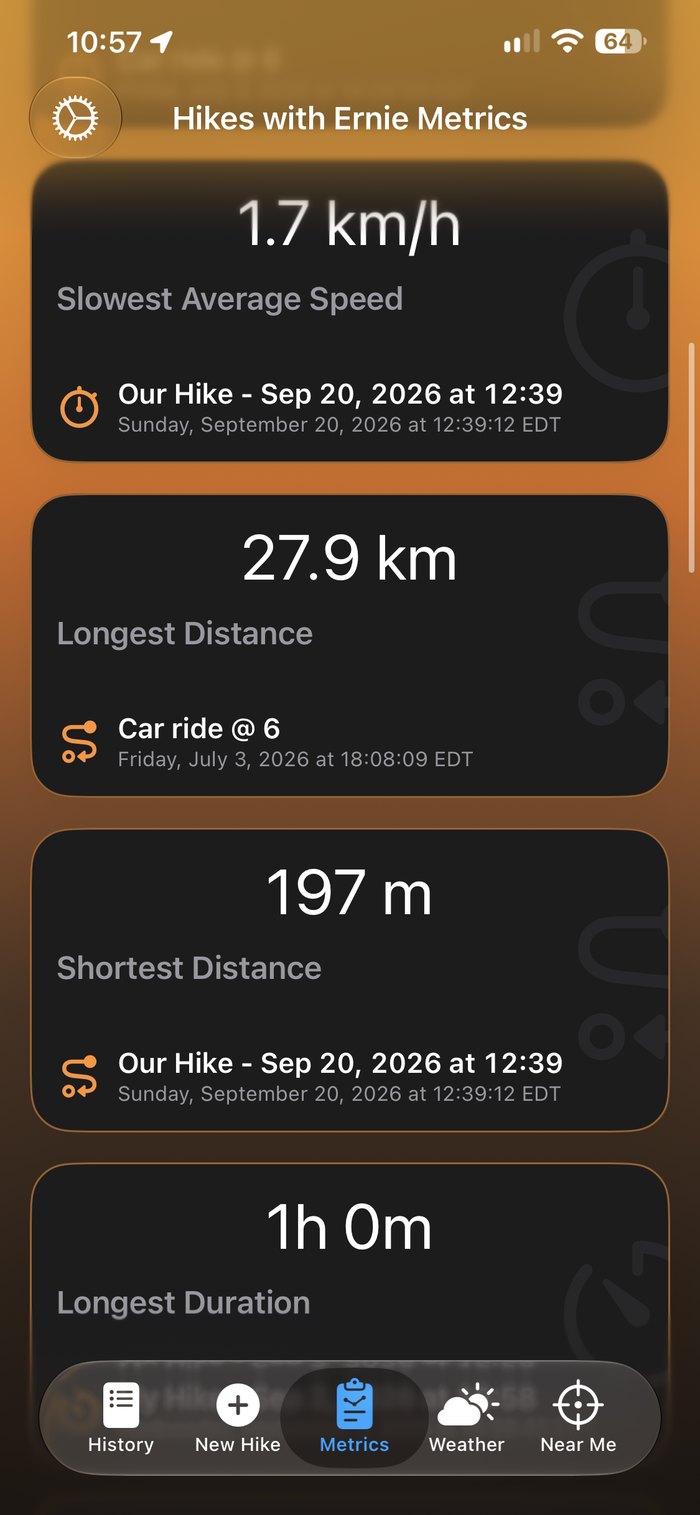
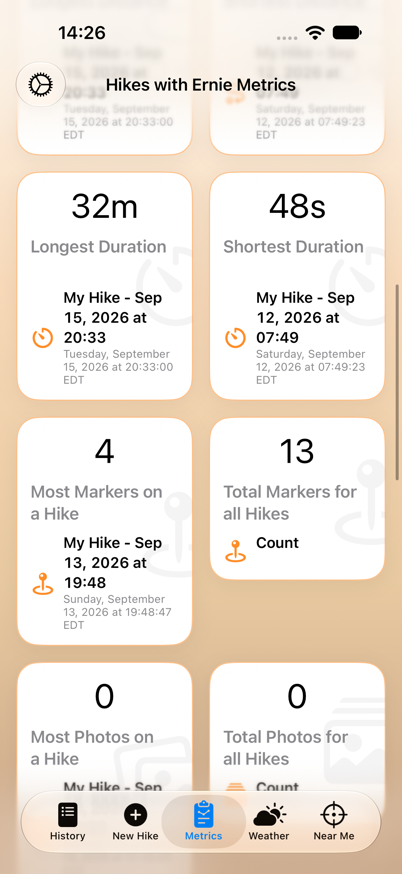
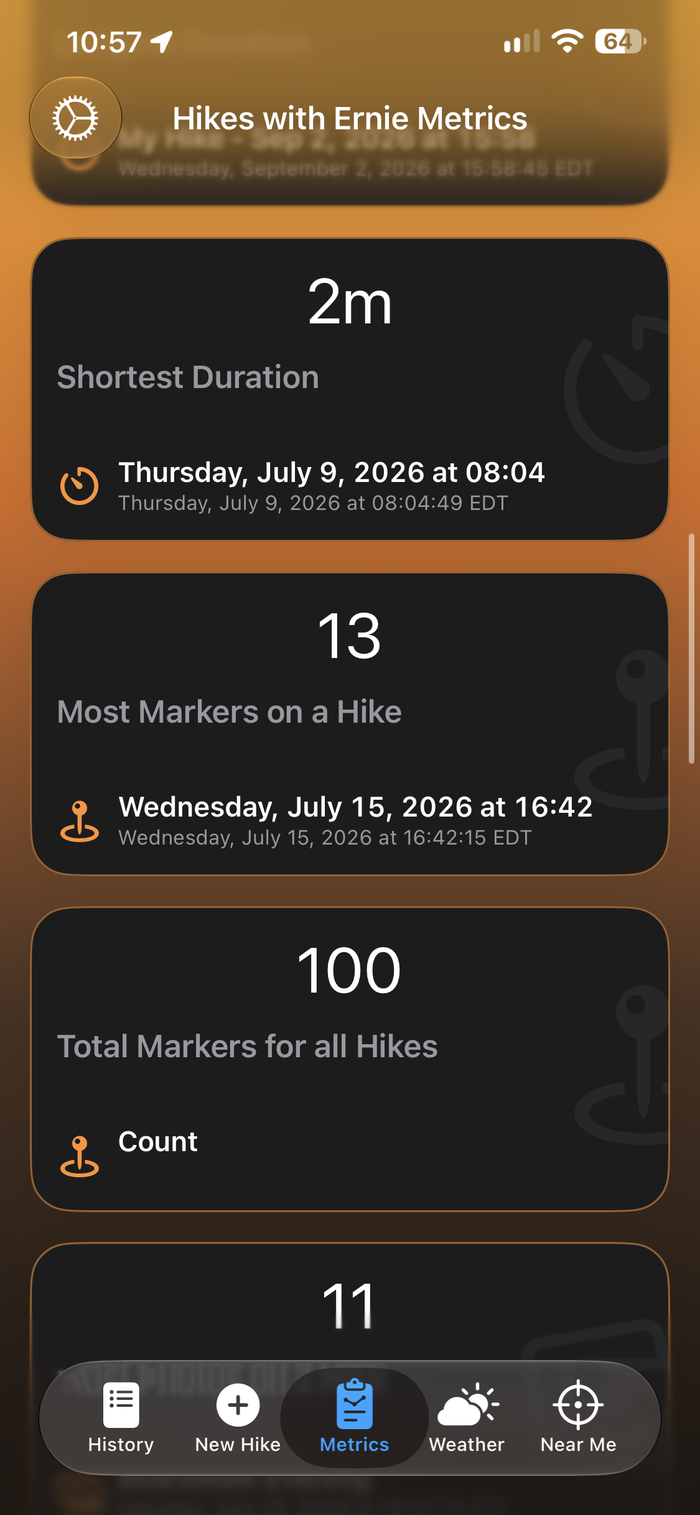
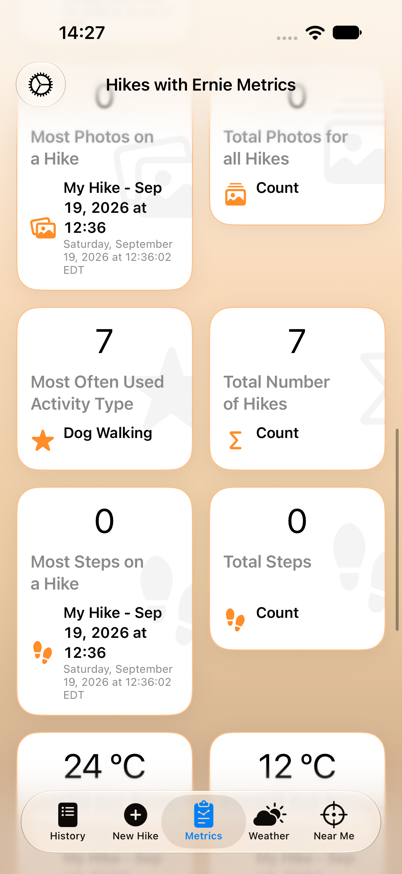
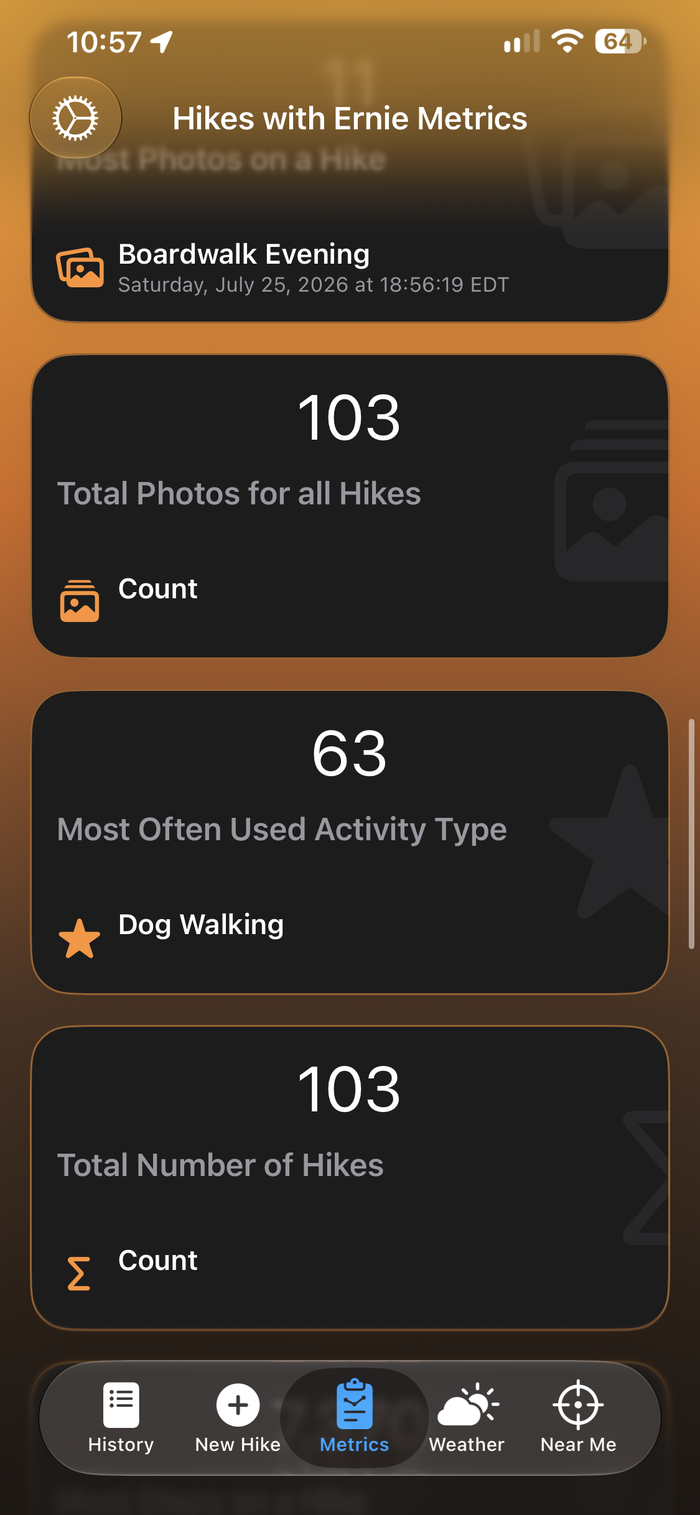
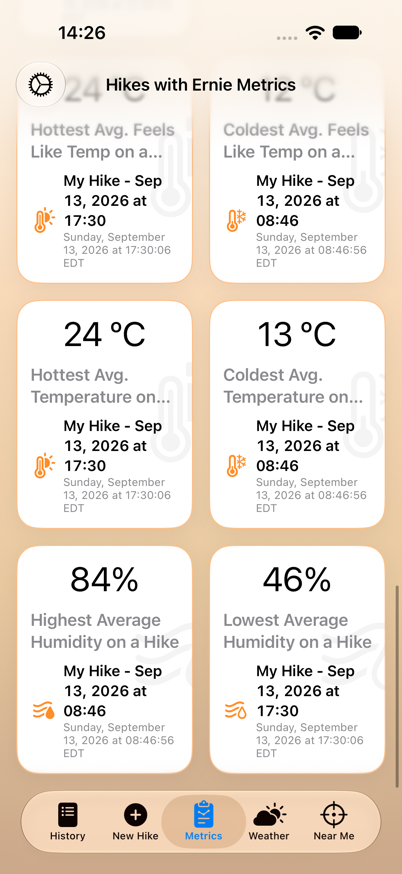
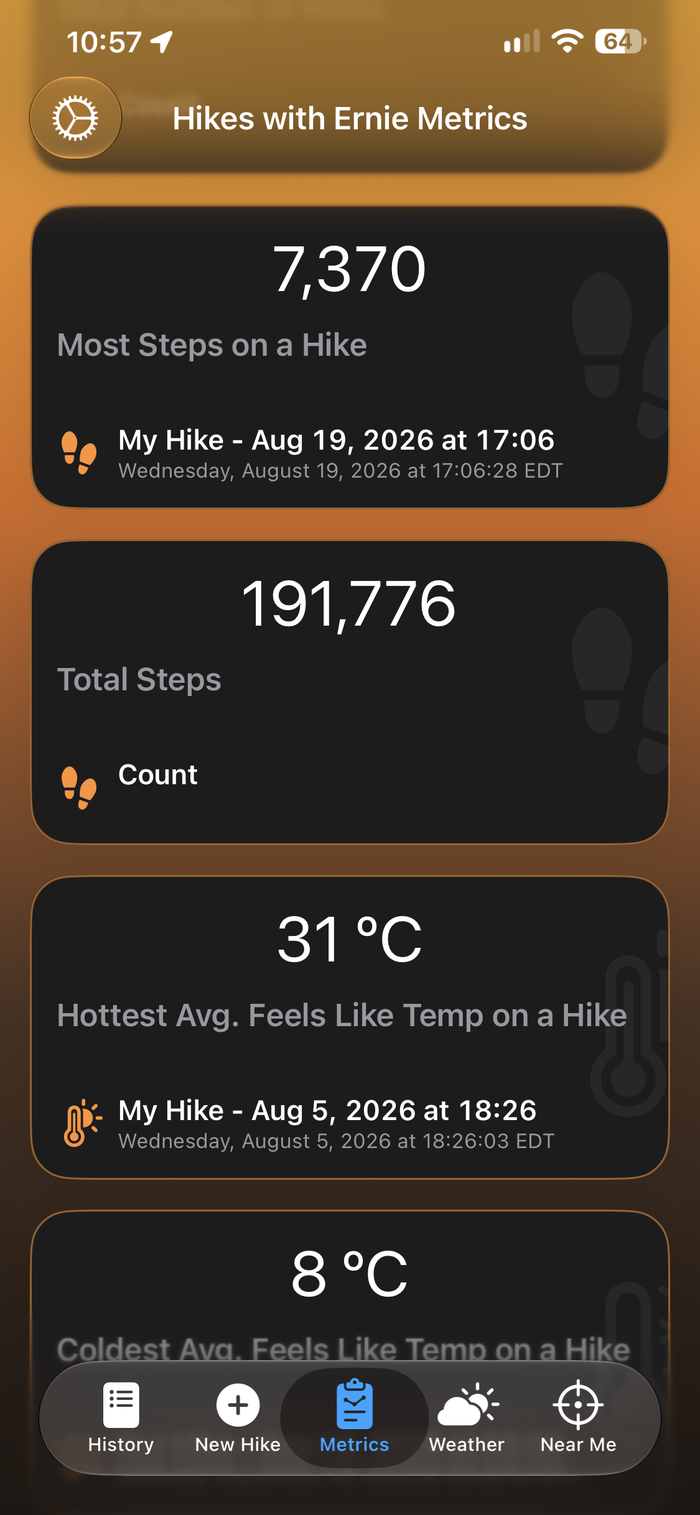
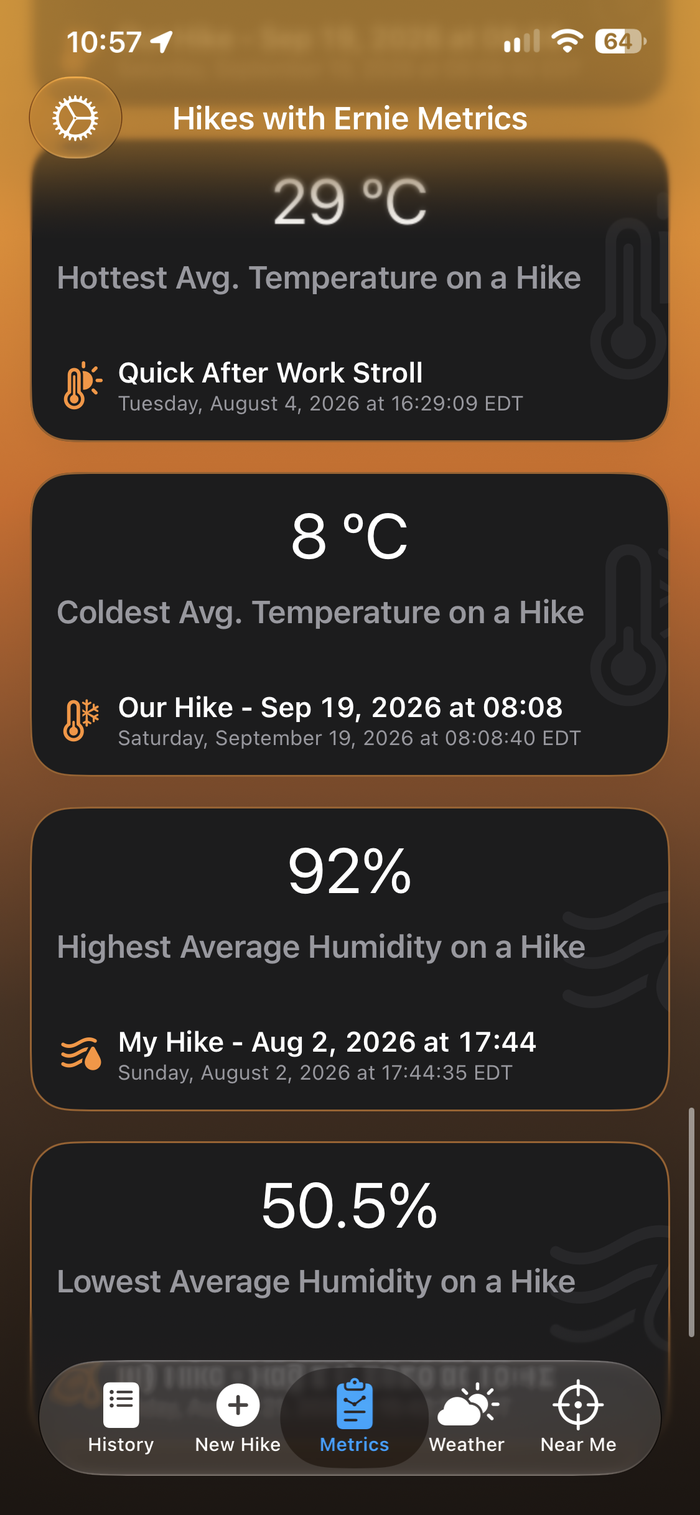
The Metrics tab works out your records and totals from every hike you've saved. Each tile shows the value in large type. For a record, it also names the hike and the date it happened.
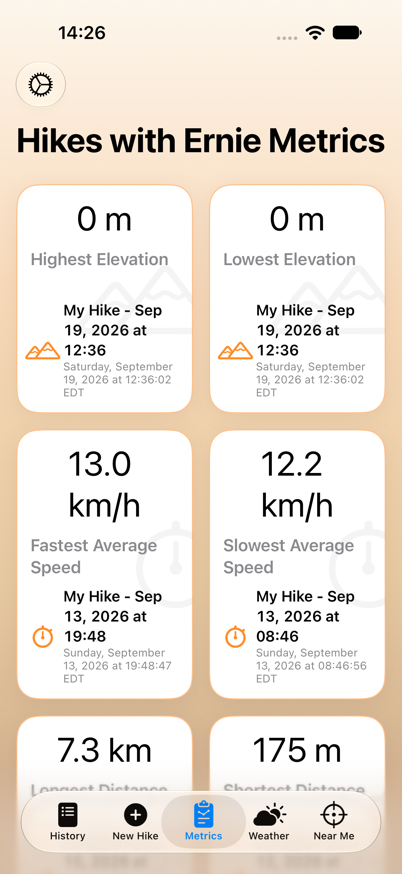
| Category | Tiles |
|---|---|
| Elevation | Highest Elevation, Lowest Elevation |
| Speed | Fastest Average Speed, Slowest Average Speed |
| Distance | Longest Distance, Shortest Distance |
| Time | Longest Duration, Shortest Duration |
| Markers | Most Markers on a Hike, Total Markers for all Hikes |
| Photos | Most Photos on a Hike, Total Photos for all Hikes |
| Activity | Most Often Used Activity Type, Total Number of Hikes |
| Steps | Most Steps on a Hike, Total Steps |
| Temperature | Hottest / Coldest Avg. Feels Like Temp, Hottest / Coldest Avg. Temperature |
| Humidity | Highest / Lowest Average Humidity on a Hike |
Units follow your Units setting. Tiles show "—" until you've saved at least one hike.
9. Weather
The Weather tab shows a detailed report for your current location from Apple Weather. The background image changes to match the conditions.
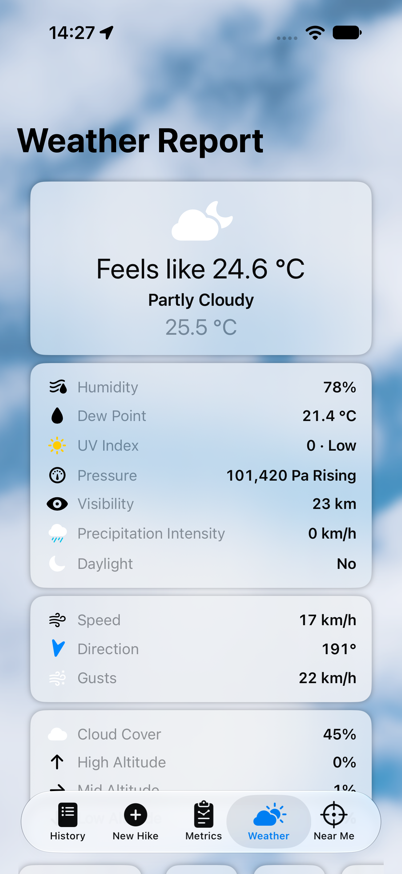
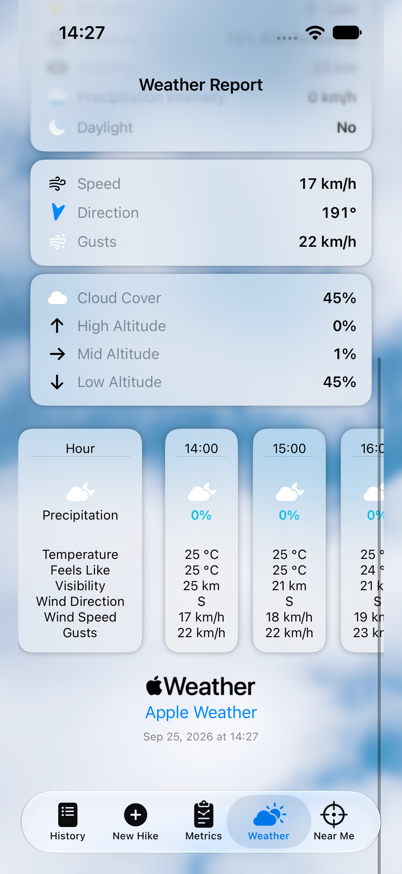
The report has these sections, from top to bottom:
- Current conditions — the weather icon, the feels-like temperature, a description such as Partly Cloudy, and the actual temperature.
- Conditions — Humidity, Dew Point, UV Index and category, Pressure and trend (Rising, Falling or Steady), Visibility, Precipitation Intensity, and whether it's currently daylight.
- Wind — Speed, Direction and Gusts. The direction arrow spins round to point the way the wind is coming from.
- Cloud Cover — the total, broken down into high, mid and low altitude.
- Hourly Forecast — swipe sideways through the coming hours. Each hour shows the conditions icon, chance of precipitation, temperature, feels-like temperature, visibility, wind direction, wind speed and gusts.
- Apple Weather attribution and the time of the report.
10. Near Me — City of Ottawa Parks
Near Me lists City of Ottawa parks close to where you are, so you can find somewhere new to walk. It's especially useful for finding places where your dog is welcome.
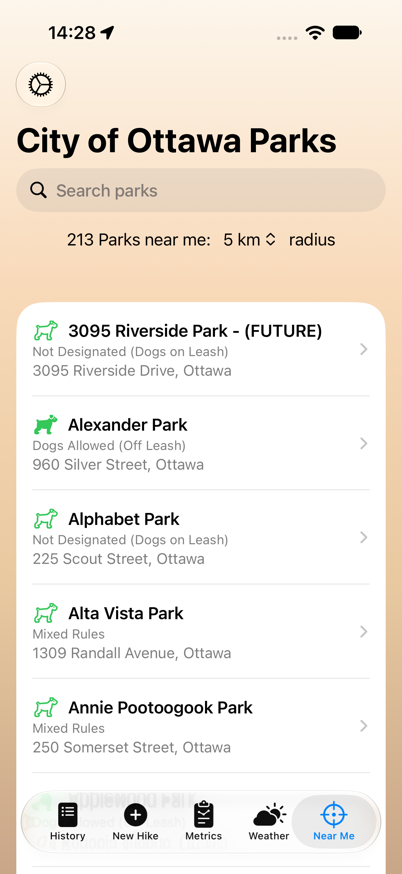
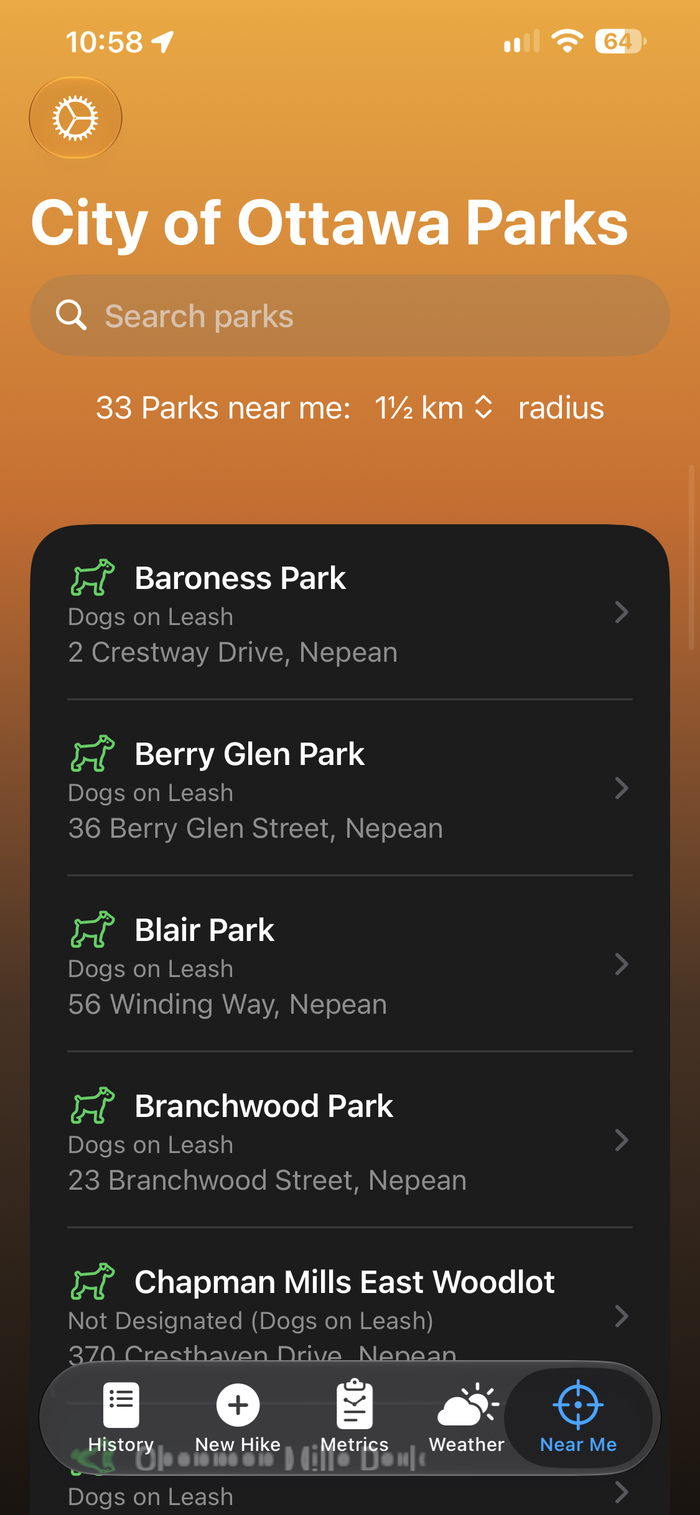
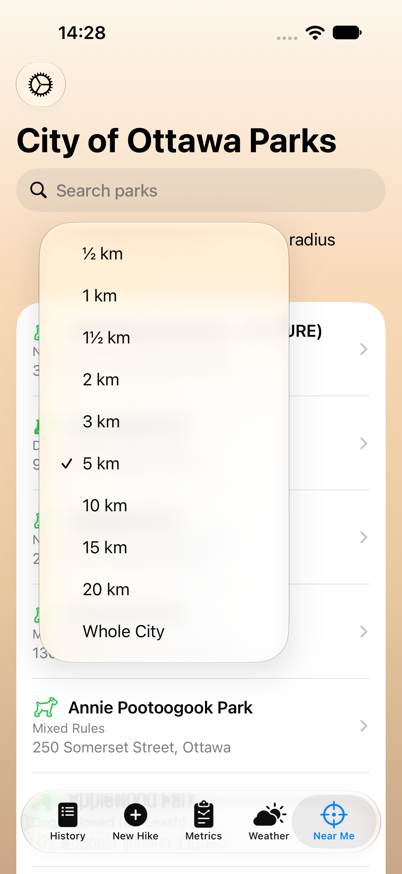
- The line at the top reads "N Parks near me: [radius] radius". Tap the radius to choose ½ km up to 20 km, or Whole City. The starting radius comes from Settings → Near Me Radius.
- Search parks filters the list by name.
- Each row shows the park name, its dog rule with an icon (for example Dogs Allowed (Off Leash), Dogs on Leash, or No Dogs allowed in red), and its address.
Park data comes from the City of Ottawa's open data service. It's downloaded when the app launches and kept on your phone for up to a week, so the list opens instantly. If no parks have loaded, you'll see No Parks Loaded. Check your internet connection and relaunch the app.
Park details
Tap a park to see its details:
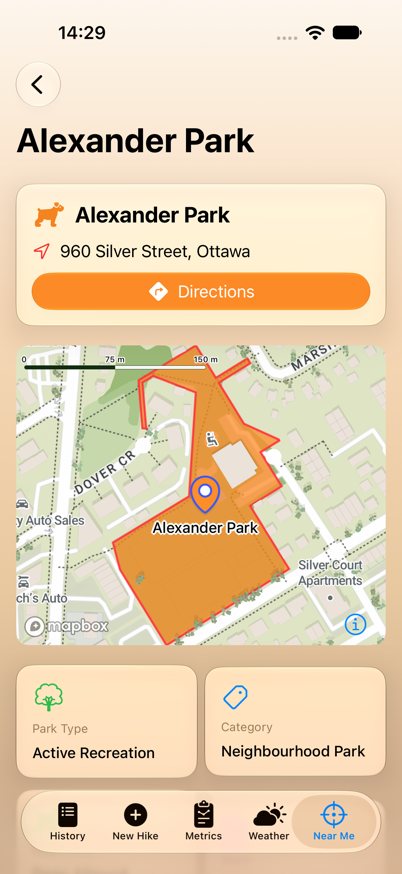
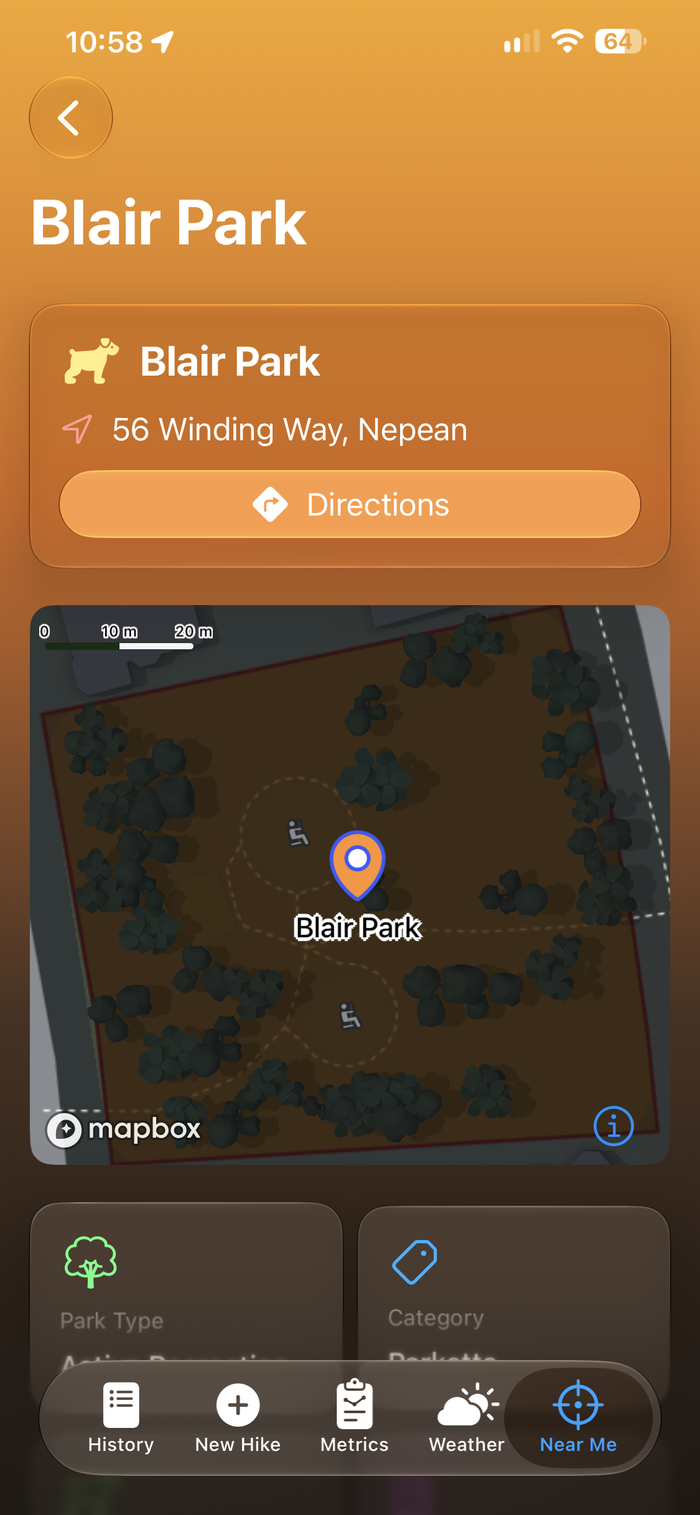
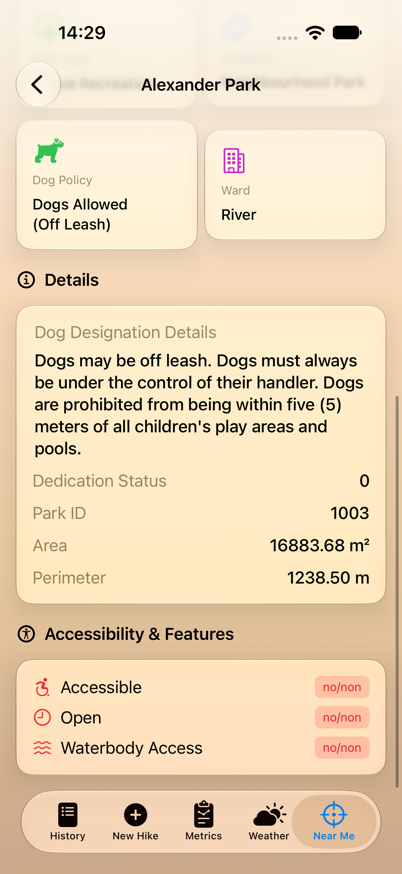
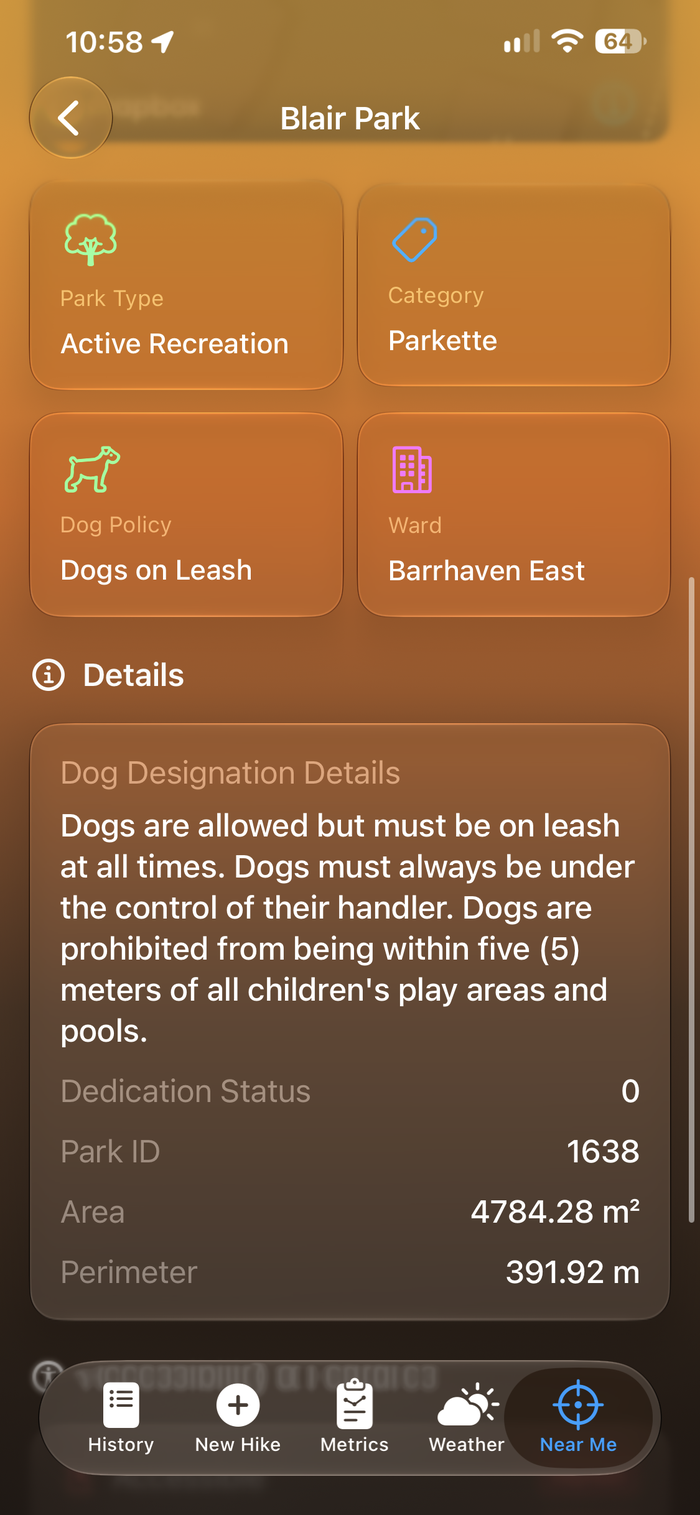
- Header — the name and address, with a Directions button that opens Apple Maps with directions from where you are.
- Map — the park's boundary, outlined and shaded in orange, with a pin.
- Info cards — Park Type, Category, Dog Policy and Ward.
- Details — Dog Designation Details (when available), Dedication Status, Park ID, Area and Perimeter.
- Accessibility & Features — whether the park is Accessible and Open, and whether it has Waterbody Access. Each shows a green or red badge.
11. Settings
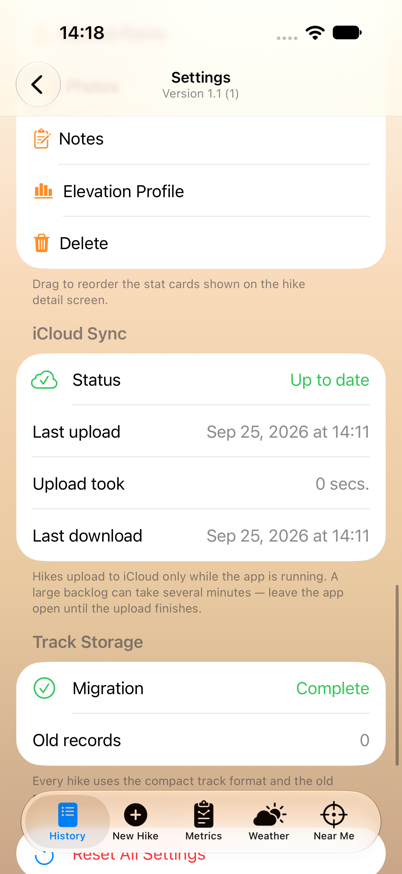
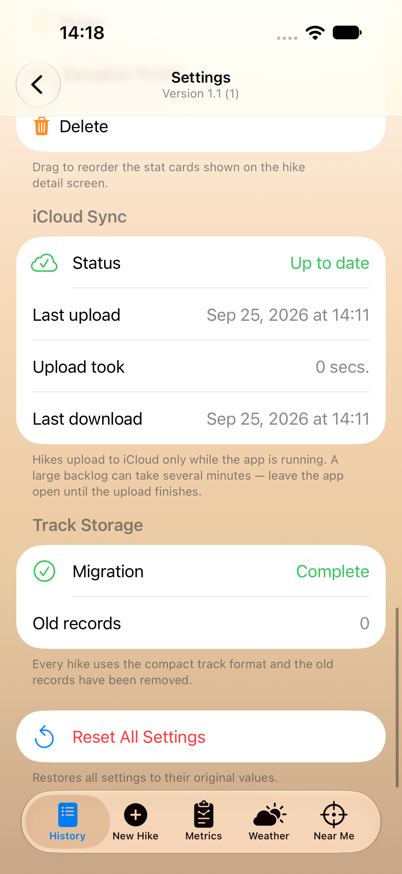
Open Settings with the ⚙︎ gear button on History, Metrics or Near Me. The app version appears under the title. Changes take effect immediately, and there's no Save button.
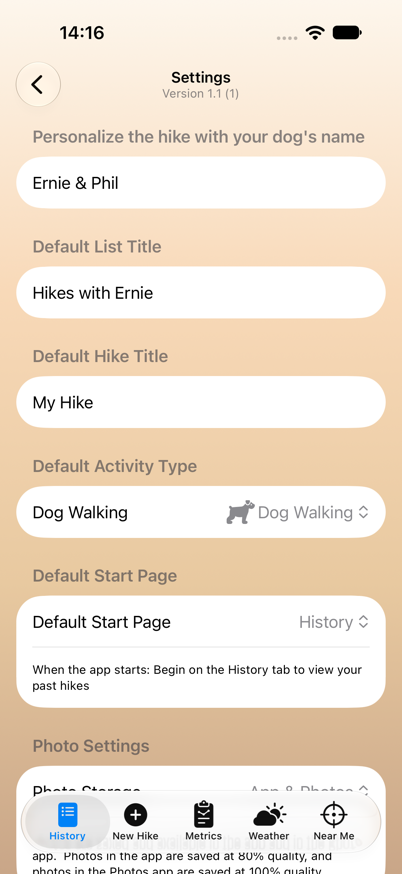
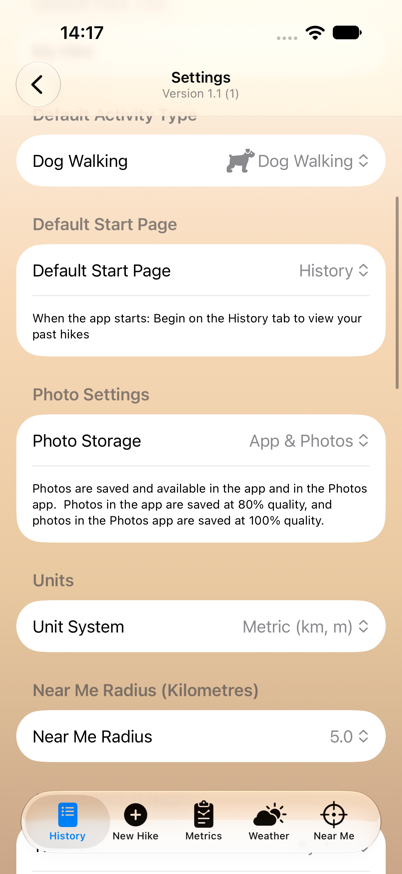
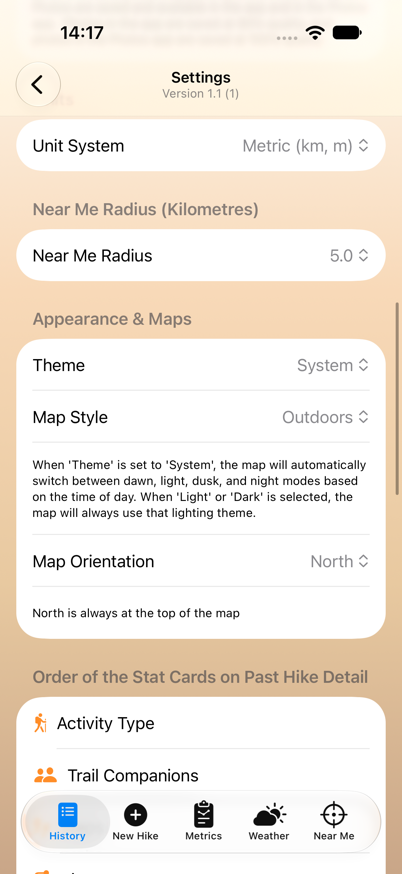
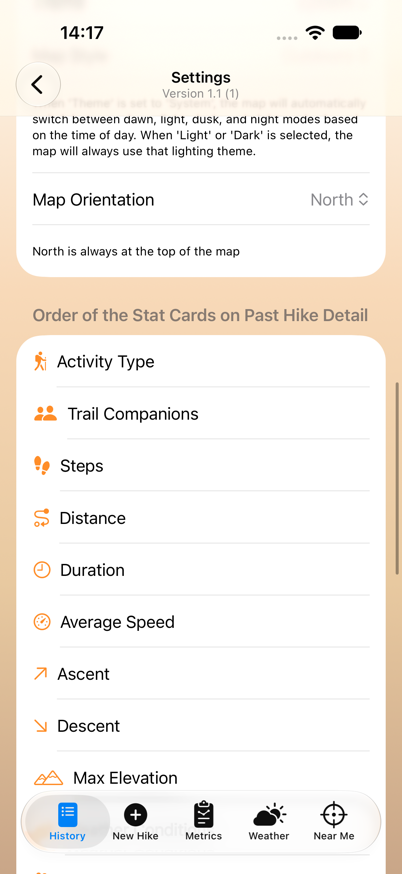
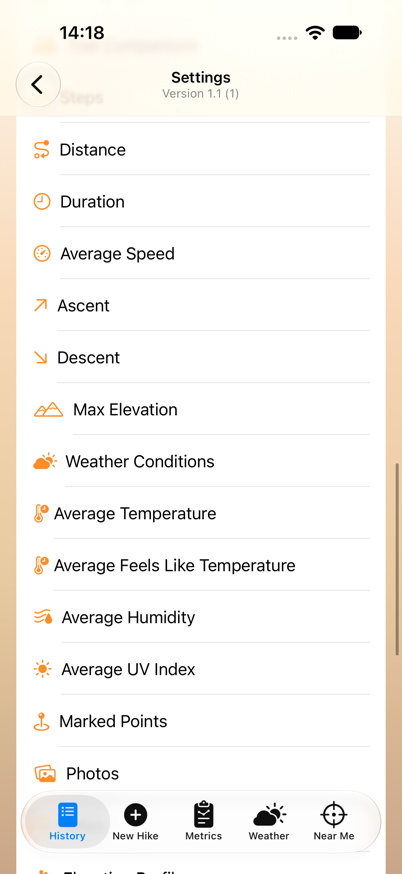
| Section | Setting | Default | What it does |
|---|---|---|---|
| Personalize | Trail companion name | Ernie & Phil | Filled in as the companions for every new hike |
| Default List Title | Hikes with Ernie | The title of the History screen. It's also used for the Metrics title. | |
| Default Hike Title | My Hike | The start of each new hike's name. The date and time are added automatically. | |
| Default Activity Type | Dog Walking | The activity new hikes start with, on both iPhone and Watch | |
| Default Start Page | History | The tab the app opens to: History, New Hike, Metrics, Weather or Near Me | |
| Photo Settings | Photo Storage | App & Photos | See Photos |
| Units | Unit System | Metric (km, m) | Switches the whole app, including the Watch, between metric and imperial (mi, ft, mph) |
| Near Me Radius | 3.0 km (after Reset) | The starting search radius on the Near Me tab. Choose 0.5–20 km or No Limit. | |
| Appearance & Maps | Theme | System | Light, Dark, or follow the system setting |
| Map Style | Outdoors | Outdoors, Satellite, Standard or Winter. With Theme set to System, the non-satellite styles change automatically through the day: dawn (3:00–5:30), day (5:30–20:30), dusk (20:30–23:00) and night. | |
| Map Orientation | North | North: north is always at the top. Heading: the map turns to face your direction of travel. | |
| Order of the Stat Cards | Standard order | Touch and hold a row, then drag it to reorder the cards on the Hike Details screen | |
| iCloud Sync | Status | — | See iCloud Sync |
| Track Storage | Migration / Old records | — | See below |
| Reset All Settings | — | Puts every setting above back to its default. Your hikes are not affected. You're asked to confirm first. |
Track Storage
This version stores each route in a compact format that syncs much faster. The Track Storage section shows how the conversion is going:
- Migration: N hike(s) pending — older hikes are still being converted. This finishes on its own.
- Migration: Complete — every hike uses the new format.
- Old records — how many old-format route points are still stored.
Once migration is complete, a Clean Up Old Track Data button appears if any old records remain. It permanently deletes those records. Your hikes and maps aren't affected, and iCloud sync gets much faster.
⚠️ Before you tap Clean Up, make sure every device — iPhone, iPad and Apple Watch — has this version of the app installed. An older version will put the old records back. Keep the app open until the clean-up finishes.
12. The Apple Watch App
The Apple Watch app records hikes from your wrist, with or without your iPhone. Swipe left and right to move between its pages. The dots at the bottom show which page you're on.
Page 1 — Start
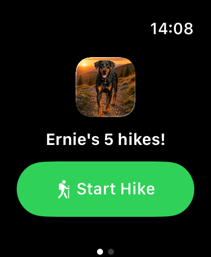
This page shows the Ernie's Hikes logo and your total number of hikes ("Ernie's 5 hikes!"). The count includes hikes from all your devices.
Tap the green Start Hike button to begin. The button changes to Hike in Progress and the app jumps to the Metrics page.
Watch hikes are named Watch Hike - date and time. They use your Default Activity Type and Trail Companion from the iPhone's Settings. You can rename them later on the iPhone (see Editing a hike).
Page 2 — Recent Hikes
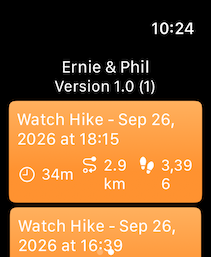
This page shows your companion name, the app version, and your 15 most recent hikes. Each one shows its name, duration, distance and steps.
Page 3 — Metrics (while you're recording)
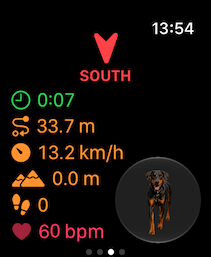
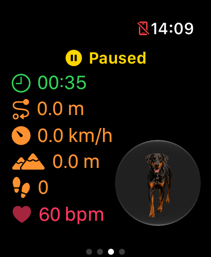
| Row | Shows |
|---|---|
| Compass (top, red) | An arrow pointing your direction of travel, with the direction written out (e.g. NORTH EAST) |
| 🕒 Time (green) | Elapsed time, updating every second |
| Distance | Distance travelled |
| Speed | Current speed |
| Elevation | Current altitude |
| 👣 Steps | Steps counted |
| ❤️ Heart rate (pink) | Your live heart rate in bpm, from the watch's heart sensor |
While paused, the compass is replaced by a pulsing yellow Paused label and the timer stops.
Page 4 — Controls (while you're recording)
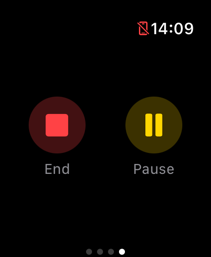
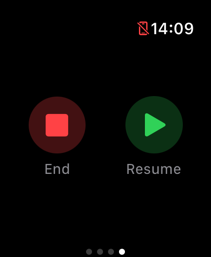
- Pause (yellow) / Resume (green) — pauses or resumes recording.
- Double Tap: You can also pause and resume by double-tapping your index finger and thumb together, on Apple Watch models that support Double Tap. You don't need to touch the screen.
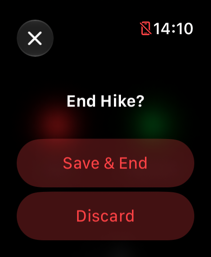
- End (red) — ends the hike. You're asked to choose:
| Choice | Result |
|---|---|
| Save & End | Saves the hike, which then syncs to your iPhone. It's also saved as a Hiking workout in Apple Health. |
| Discard | Deletes the hike. Nothing is saved to Health. |
| ✕ (top-left) | Cancels and keeps recording |
Recording in the background
While a hike is recording, the watch app runs a workout session, just like the built-in Workout app. That means it keeps recording with the screen off, or while you're on the watch face. To get back to the hike, raise your wrist and tap the app, or use the complication.
Watch complications and Smart Stack widget
Add the Ernie's Hikes widget to a watch face or to the Smart Stack:
| Style | While hiking | When idle |
|---|---|---|
| Rectangular (Smart Stack) | Activity icon, hike name and a live elapsed timer. Shows Paused when paused. | "Ernie's Hikes — Tap to start a hike" |
| Circular / Corner | Activity icon with a timer below it (green) | Orange hiking figure |
| Inline | "Hiking 12:34" or "Hike paused" | "Ernie's Hikes" |
Tap the widget to open the watch app.
When you record a hike on your iPhone, its Live Activity also appears in your watch's Smart Stack (see Live Activity).
What the watch app doesn't do
To keep it simple and save battery, the watch app doesn't show a map and doesn't do markers, photos or weather. Use the iPhone for those. Once a watch hike syncs to your iPhone, you get its full map, statistics and elevation profile there.
13. iCloud Sync
All hike data syncs automatically through your private iCloud account to every iPhone, iPad and Apple Watch signed in with the same Apple Account. That includes routes, statistics, markers, notes and photo records. There's nothing to set up beyond being signed in to iCloud.
Checking sync status
Go to Settings → iCloud Sync:
| Status | Meaning |
|---|---|
| ✅ Up to date (green) | The last upload finished successfully |
| ⬆️ Uploading… | Changes are being sent to iCloud |
| ⚠️ Upload failed (red) | Something went wrong. A short explanation appears in red below. |
| ☁️ Waiting | No upload has happened yet in this session |
The section also shows the Last upload and Last download times, and how long the last upload took.
Sync tips
- Hikes upload only while the app is open. After a long hike, or the first time you use a new device, keep the app open until the status says Up to date.
- Apple Watch without cellular: The hike is stored on the watch until it can get online, through your iPhone nearby or Wi-Fi. Open the watch app for a minute once you're back in range so the upload can finish. Watch sessions are short, so an upload can be cut off if the app closes too soon.
- Apple Watch with cellular: Hikes can sync straight from the trail.
- If you aren't signed in to iCloud, hikes stay on the device that recorded them.
14. Tips and Troubleshooting
Tips
- Start faster: Set Default Start Page to New Hike so the app opens ready to record.
- Mark things as they happen: Use Quick Markers for one-tap warnings while you're moving. Use the Add Marker form when you've stopped and want to write notes.
- Check GPS accuracy: A smaller GPS ± value in the Control Panel means a more accurate position. Accuracy is best with a clear view of the sky.
- Choose "Always" for Location so your route keeps recording with the phone in your pocket and the screen locked.
- Pause for breaks rather than ending the hike, so a coffee stop doesn't split your walk into two hikes.
- Forgot to stop recording? Edit the hike and correct the End Date & Time.
- Find your best walks: Sort History by Distance or Duration, and check the Metrics tab for your records.
- Winter walks: Try the Winter map style for better contrast on snow-covered trails.
Troubleshooting
| Problem | What to try |
|---|---|
| "Location access denied" in the Control Panel | iPhone Settings → Ernie's Hikes → Location → choose While Using or Always |
| Stuck on "Acquiring altitude…" | Move outdoors with a clear view of the sky and wait a few seconds |
| Route stops recording when the phone is locked | Set Location to Always. Don't force-quit the app during a hike. |
| No step count | iPhone Settings → Ernie's Hikes → Motion & Fitness → turn it on |
| No Live Activity | iPhone Settings → Ernie's Hikes → Live Activities → turn it on |
| Hike isn't showing on another device | Open the app on the device that recorded it and wait until Settings → iCloud Sync says Up to date. Check that both devices use the same Apple Account. |
| Photos don't show on my iPad | With App Only photo storage, photos stay on the device that took them. Choose App & Photos to also save them to your Photos library. |
| Near Me says "No Parks Loaded" | Check your internet connection and relaunch the app |
| Heart rate shows "-- bpm" on the watch | Make sure the watch fits snugly and Health access was allowed (iPhone Health app → Sharing → Apps → Ernie's Hikes) |
15. Meet the Team
Ernie's Hikes is made by Phil, with Ernie — his Doberman and constant trail companion — as chief inspiration, first tester, and the whole reason the app exists.
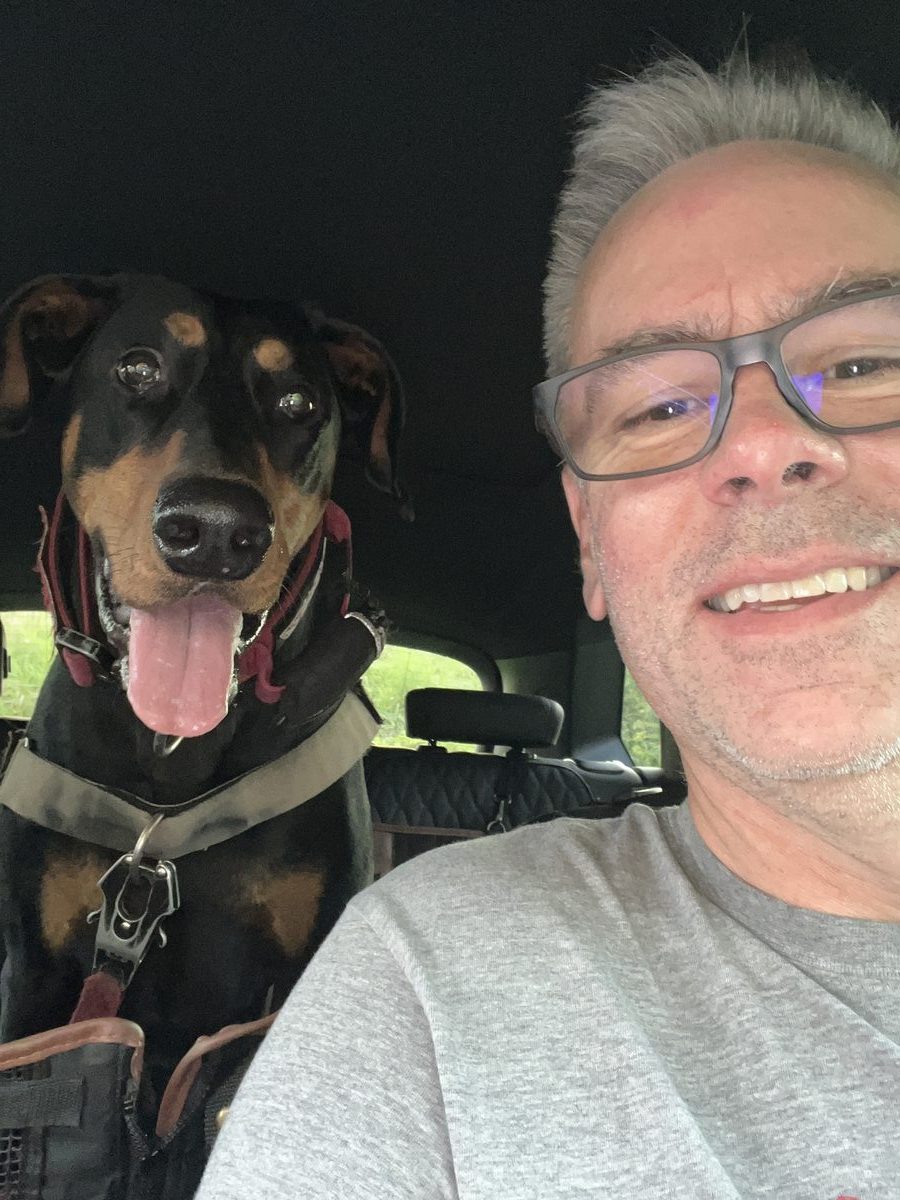
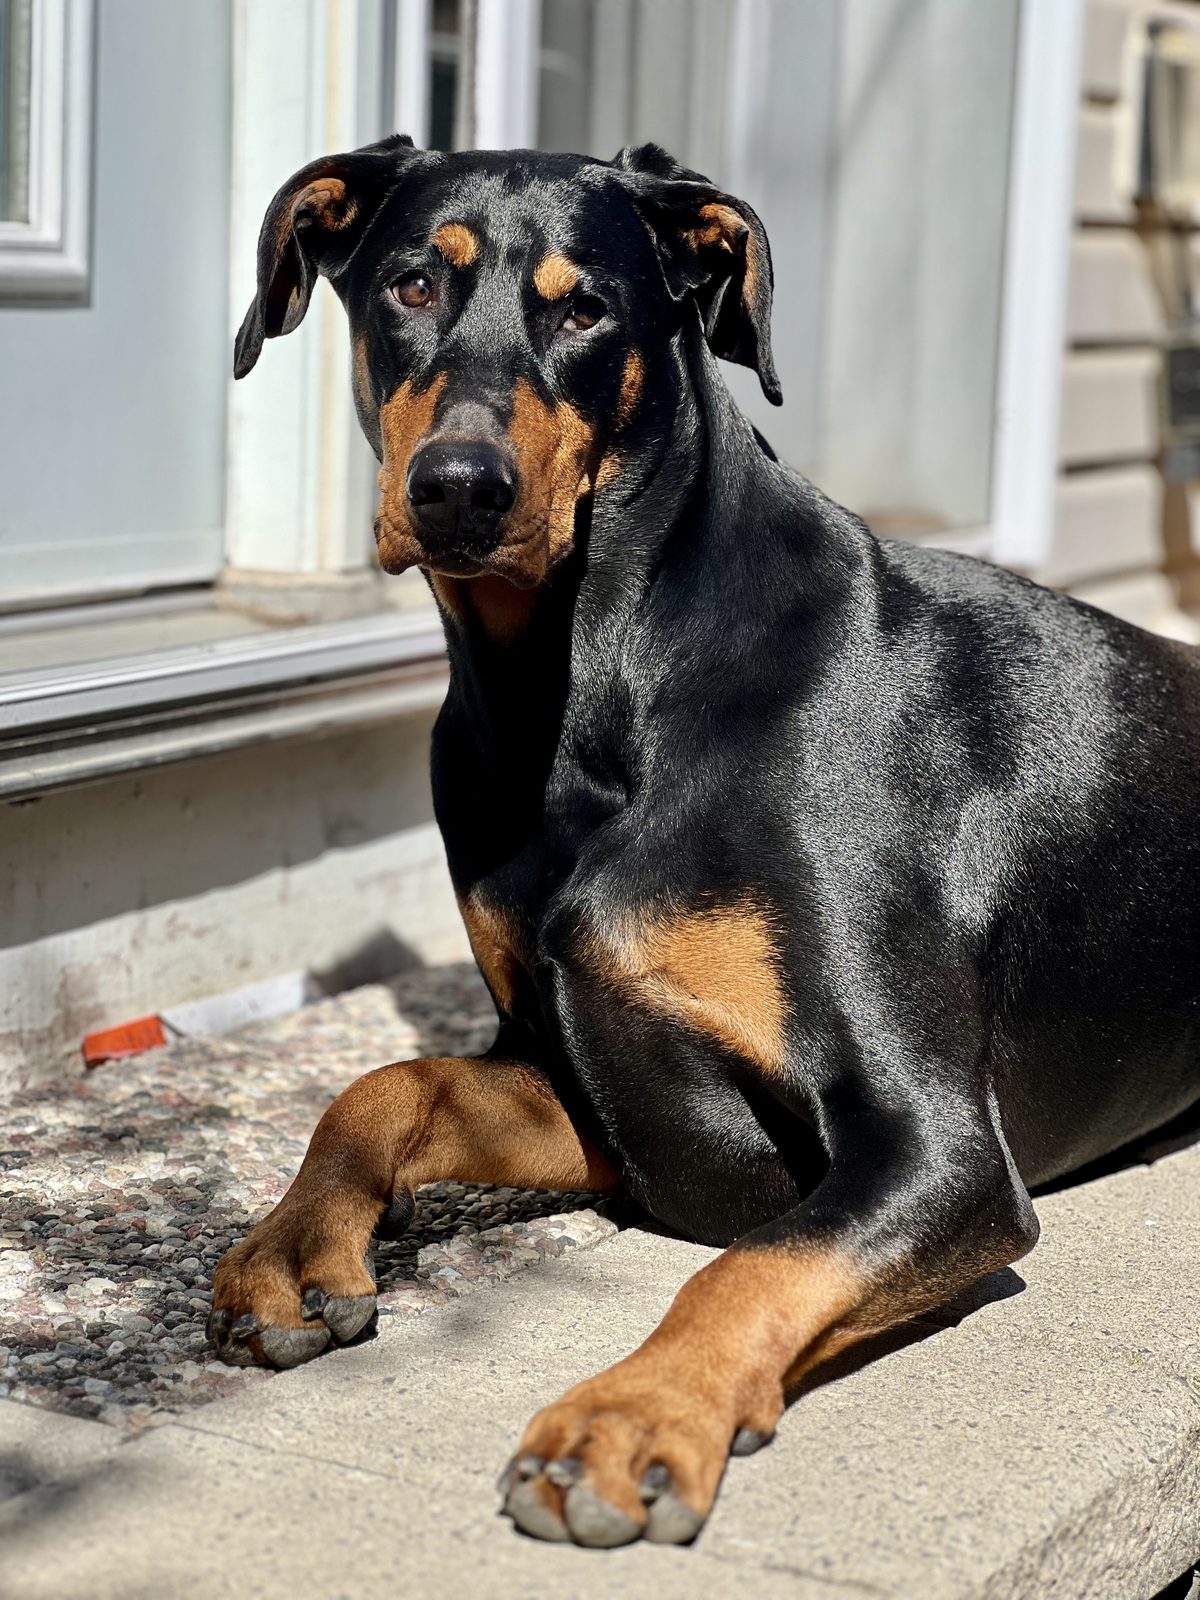
Every default Trail Companion name, every dog-themed marker, and a fair bit of the app's personality trace straight back to actual hikes with this actual dog.
Weather data provided by Apple Weather. Park data provided by the City of Ottawa. Maps © Mapbox and OpenStreetMap contributors.